RK1820/RK1828 AI Accelerator Development Guide
Based on OK3588-C development board + RK182X co-processor architecture, RKNN3 SDK V1.0.0 | Test data based on RK1828
1. Overview
This document is intended for developers who need to deploy AI models using the RK1820/RK1828 co-processor on the OK3588-C development board platform. It covers hardware architecture, development environment setup, model conversion, quantization, and deployment for CNN/LLM/VLM models, as well as the usage of the RKLLM3 Server.
The RK182X series is an AI coprocessor designed by Rockchip for edge-side large model inference. It employs 3D RAM stacking technology, vertically interconnecting DRAM and NPU dies. It is not an independent SoC, but functions as an NPU accelerator card mounted under host chips such as the RK3588, working collaboratively via high-speed PCIe/USB interfaces.
The RKNN3 SDK offers a comprehensive AI model deployment solution, primarily consisting of the following components:
RKNN3 Toolkit: A PC-side model conversion and evaluation tool that supports converting models from frameworks such as ONNX, PyTorch, and TensorFlow to the RKNN format;
RKNN3 Runtime: A board-side inference runtime that provides C/C++ API and Python API;
RKNN3 Model Zoo: A collection of model conversion and deployment examples covering scenarios like CNN, LLM, and VLM;
RKNN3 Toolkit Lite: A board-side Python inference interface;
RKLLM3 Server: An OpenAI-compatible API service supporting text and image input.
RKNN3 is an independent toolchain from the previous RKNN-Toolkit / RKNN-Toolkit2, and their model formats are not compatible.
1.1 RKNN3 SDK Software Framework
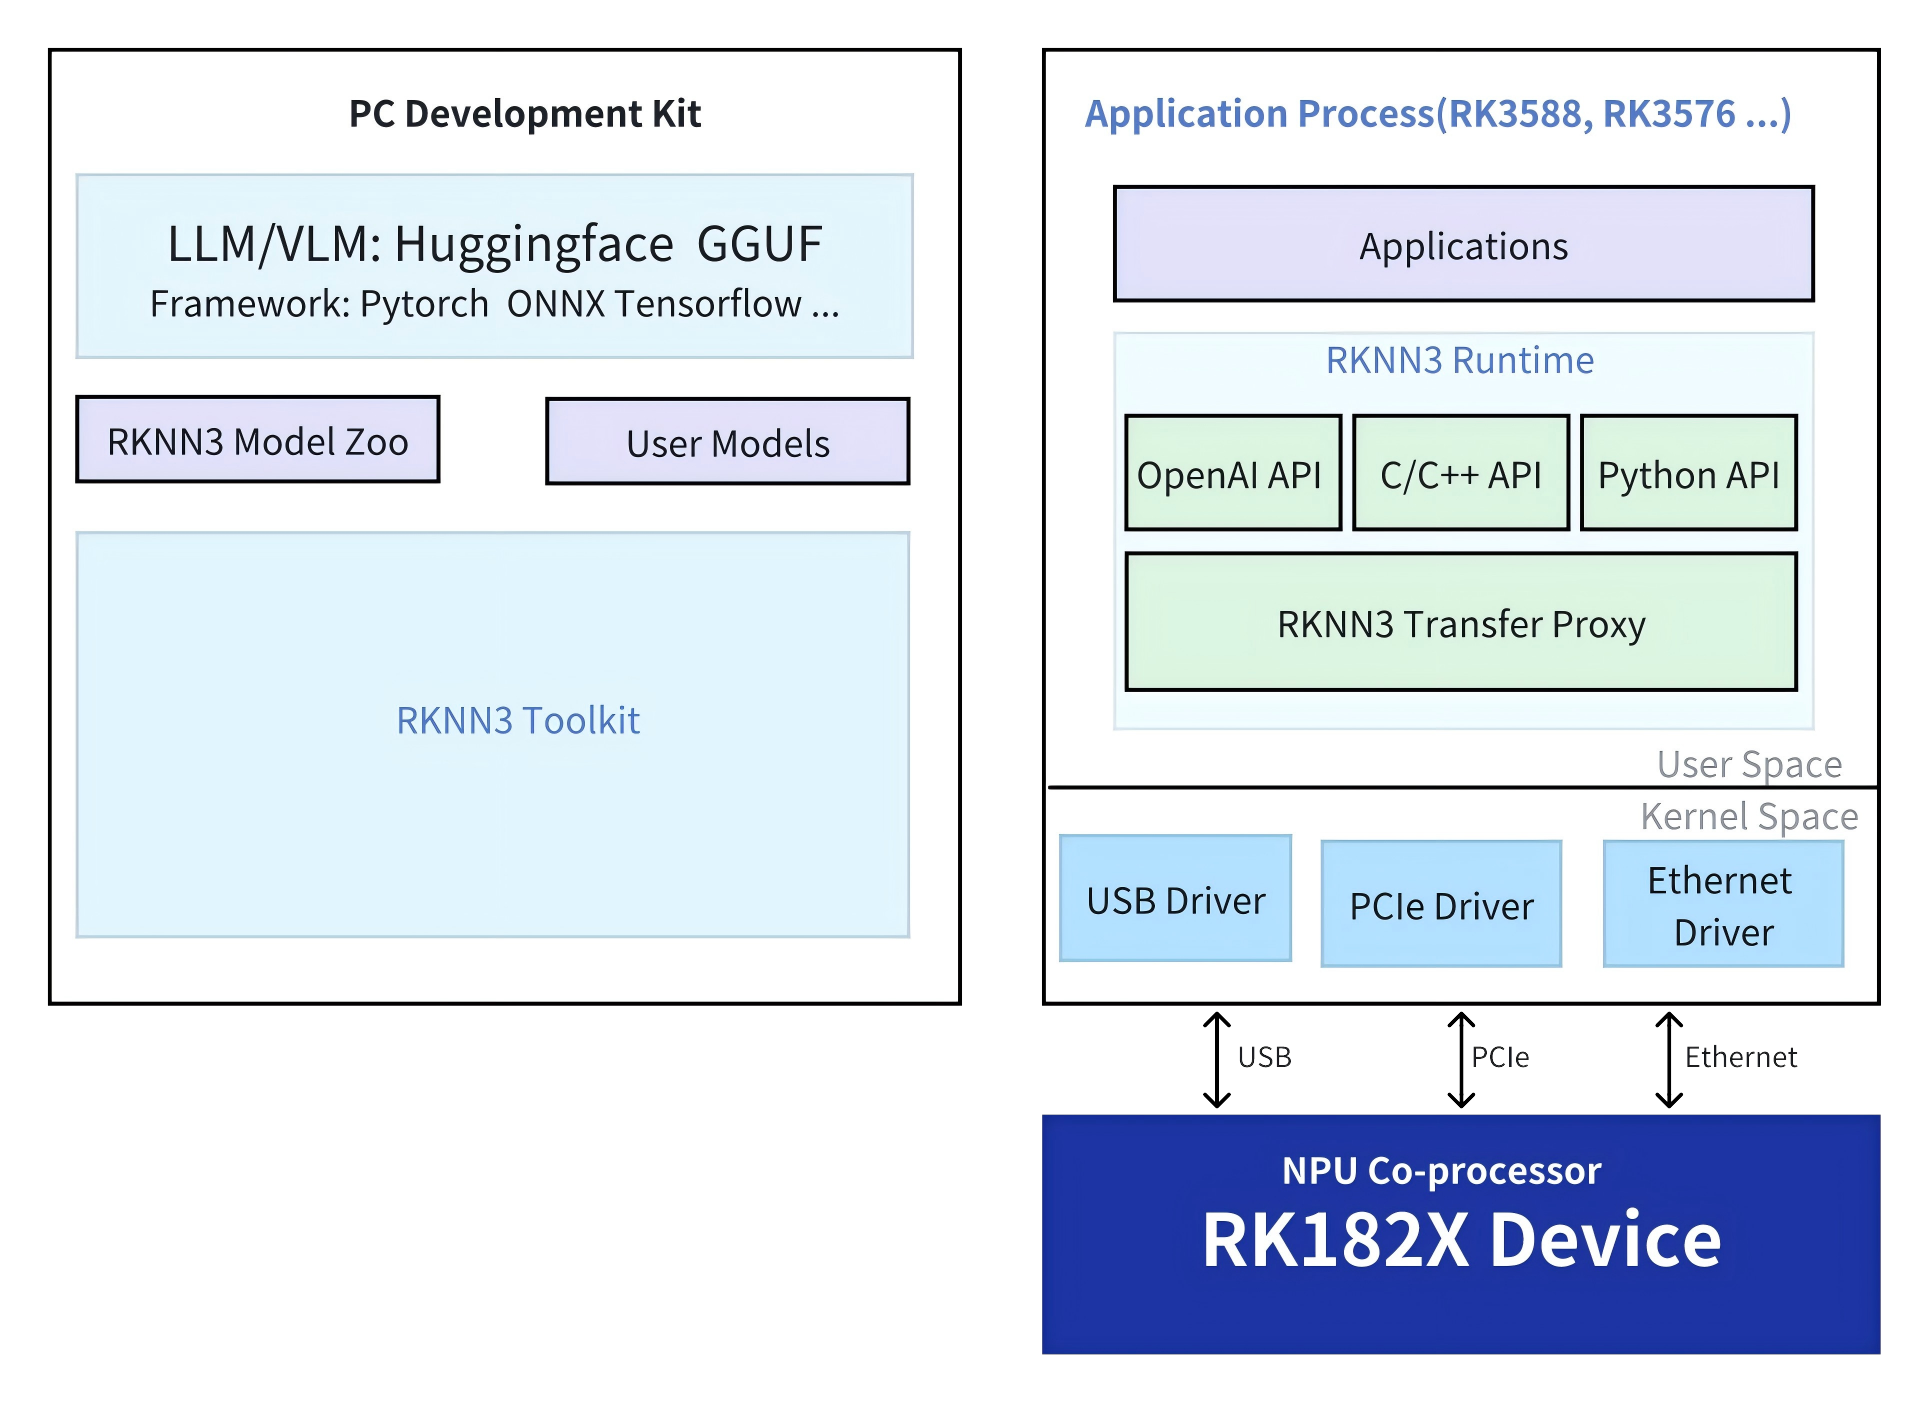
Core components of the board-side runtime environment:
rknn3-api( Link during development: librknn3_api.so):
rknn3-api
├── include
│   ├── float16.h
│   └── rknn3_api.h
├── Android/arm64-v8a/librknn3_api.so
└── Linux/aarch64/librknn3_api.so
rknn3_transfer_proxy (a communication proxy between the Host and the RK182X co-processor, supporting PCIe and USB):
rknn3_transfer_proxy
├── android-arm64-v8a/rknn3_transfer_proxy
└── linux-aarch64/rknn3_transfer_proxy
rkllm3 Server: An OpenAI-compatible API service supporting text and image input.
rkllm3-server
├── bin
│   ├── android_arm64-v8a/rkllm3-server
│   └── linux-aarch64/rkllm3-server
1.2 Supported Hardware Platforms
OK3588-C Development Board + RK1820/RK1828 Co-processor
1.3 Supported Operating Systems
Android / Linux
2. Hardware Platform
2.1 Comparison of Specifications Between RK1820 and RK1828
Parameter |
RK1820 |
RK1828 |
|---|---|---|
NPU computing power( INT8) |
20 TOPS |
20 TOPS |
On-chip DRAM (Memory) |
2.5GB |
5GB |
Maximum Supported Model Size |
≤ 3B Parameters |
≤ 7B Parameters |
Package |
3D RAM Stacking |
3D RAM Stacking |
Supported Accuracy |
INT4 / INT8 / INT16 / FP16 |
INT4 / INT8 / INT16 / FP16 |
Main Control Interfaces |
PCIe 2. 1 |
PCIe 2.1 |
NPU Frequency |
1 GHz |
1 GHz |
The NPU architecture of both is identical, with the difference being the on-chip DRAM capacity. RK1820 is suitable for 0.5B to 3B models, while RK1828 can handle up to 7B to 8B models.
2.2 System Architecture
┌──────────────────────────────────────────────────┐
│                  Application Layer                 │
│          User Logic, Data Acquisition, Result Display   │
├──────────────────────────────────────────────────┤
│                Middleware Layer                    │
│   Task Scheduling, Data Preprocessing, PCIe/USB Communication Management  │
├────────────────────┬─────────────────────────────┤
│   RK3588 (Host)    │     RK182X (Device)         │
│                    │                             │
│  - CPU Task Scheduling│  - NPU Model Inference   │
│  - Light AI Inference │  - High-Compute-Intensity Operations│
│  - Peripherals/Video  │  - On-Chip High-Bandwidth Memory │
│  - 6 TOPS NPU      │  - 20 TOPS NPU             │
├───────────────────┴─────────────────────────────┤
│            PCIe 3.0 / USB 3.0 Bus               │
│       Low Latency, High-Bandwidth Data Exchange (DMA)  │
└──────────────────────────────────────────────────┘
2.3 Application Scenarios
The RK182X is designed for LLM / VLM edge-side inference acceleration. It can also run traditional CV tasks (e.g., YOLOv5/v6/v8, ResNet), but for these compute-bound CNN models, the built-in NPU of the OK3588-C development board is sufficient.
Advantageous scenarios for the RK182X include: large language model inference, VLM multimodal inference, all-modal models (vision + speech + text), digital human interaction, and smart cabin AI Box.
3. Development Environment Setup
3.1 Environment Requirements Based on OK3588-Ubuntu 22.04.5 (Kernel 6.1.18)
Complete system setup using the update.img provided in the OK3588_182X_m2_AI_SDK\OK3588-ubuntu22-img directory.
3.2 Obtaining the RK1820_RK1828_AI_SDK_V1.0.0.tgz Package from the OK3588_182X_m2_AI_SDK
mkdir Projects && cd Projects
cd Projects
# Extract RK1820_RK1828_AI_SDK_V1.0.0.tgz SDK package(include toolkit, toolkit-lite, runtime)
mkdir -p RK1820_RK1828_AI_SDK_V1.0.0
tar xzf RK1820_RK1828_AI_SDK_V1.0.0.tgz -C RK1820_RK1828_AI_SDK_V1.0.0
Overall directory structure:
RK1820_RK1828_AI_SDK_V1.0.0/
├── build.sh
├── docs/                          # Documentation
├── driver/                        # Drivers
├── examples/                      # Examples
├── package/                       # Installation Packages
├── pkgroot/
├── scripts/                       # Script Tools
└── rknn/                          # RKNN3 Core Components
    ├── rknn3-model-zoo/           # Model Conversion & Deployment Examples
    │   ├── 3rdparty/
    │   ├── datasets/
    │   ├── examples/              # CNN/LLM/VLM Model Examples
    │   ├── py_utils/
    │   ├── tokenizer/
    │   ├── tools/
    │   ├── utils/
    │   ├── build-linux.sh
    │   └── build-android.sh
    ├── rknn3-toolkit/             # PC-Side Model Conversion Tools
    │   ├── doc/
    │   ├── rknn3-toolkit/         # Toolkit Installation Package (whl)
    │   └── rknn3-toolkit-lite/    # Board-Side Python API
    ├── rknn3-runtime/             # Board-Side Runtime
    │   ├── doc/
    │   ├── examples/
    │   ├── rknn3-api/             # C API Header Files and librknn3_api.so
    │   ├── rknn3_transfer_proxy/  # Host ↔ Device Communication Proxy
    │   └── rkllm3-server/         # OpenAI-Compatible API Service
    └── rknn-gstreamer-plugins/    # GStreamer Plugins
3.3 Installation of the rknn3-toolkit Environment
System requirements: Ubuntu 20.04 / 22.04 (x86_64), Python 3.10 (recommended).
# Download the Miniforge tool or use the Miniforge3-Linux-x86_64.sh provided by OK3588_182X_m2_AI_SDK
wget -c https://mirrors.tuna.tsinghua.edu.cn/github-release/conda-forge/miniforge/LatestRelease/Miniforge3-Linux-x86_64.sh

# Install the Miniforge tool
chmod +x Miniforge3-Linux-x86_64.sh
bash Miniforge3-Linux-x86_64.sh

# Create a conda environment
conda create -n rknn3 python=3.10
conda activate rknn3

# Install dependencies and toolkit
cd RK1820_RK1828_AI_SDK_V1.0.0/rknn/rknn3-toolkit/rknn3-toolkit/packages
pip install -r requirements_cp310-x.x.x.txt
pip install rknn3_toolkit-x.x.x-cp310-cp310-manylinux_2_17_x86_64.manylinux2014_x86_64.whl
Verify installation:
python
>>> from rknn.api import RKNN
Note: The Python import path for rknn3-toolkit is the same as rknn-toolkit2, but their whl packages are not interchangeable.
3.4 Installation of the rknn3-toolkit-Lite Environment
System requirements (board-side): Ubuntu 22.04, Python 3.10 (recommended).
# Install dependencies and rknn3-toolkit-lite
cd RK1820_RK1828_AI_SDK_V1.0.0/rknn/rknn3-toolkit/rknn3-toolkit-lite/packages
adb push requirements.txt
adb push rknn3_toolkit_lite-x.x.x-cp310-cp310-linux_aarch64.whl
pip install -r requirements.txt
pip install rknn3_toolkit_lite-x.x.x-cp310-cp310-linux_aarch64.whl
3.5 Installation of Compilation Tools and ADB
CMake (virtual machine):
sudo apt update && sudo apt install cmake
Cross-compiler (virtual machine):
# Download GCC 6.3.1 cross compiler
wget https://releases.linaro.org/components/toolchain/binaries/6.3-2017.05/aarch64-linux-gnu/gcc-linaro-6.3.1-2017.05-x86_64_aarch64-linux-gnu.tar.xz

# Unzip to projects directory
tar xf gcc-linaro-6.3.1-2017.05-x86_64_aarch64-linux-gnu.tar.xz -C Projects/
NDK: It is recommended to download version r19c.
ADB (virtual machine):
# Install ADB and fastboot
sudo apt install adb fastboot -y

# ADB network connection board end
adb connect "Board-en IP":5555

# View the current ADB connection status
adb devices
3.6 Installation of Dependencies for RK182X
Deploy the pcie-rkep.ko driver file provided by OK3588_182X_m2_AI_SDK to: /Usr/lib/modules/pcie-rkep.ko, then load the driver.
adb push pcie-rkep.ko /usr/lib/modules/pcie-rkep.ko
insmod /usr/lib/modules/pcie-rkep.ko
Install dependencies required for RK182X: Install the RK182X m2 precompiled package on the OK3588-C development board.
# Execute on the PC side
adb push rknn3_rk182x_m2_installer_arm64.tgz /tmp/installer.tgz
adb shell "cd /tmp && tar xzf installer.tgz && ./install.sh"
Reboot the OK3588-C development board to apply the dependencies. After reboot, check the RK182X status. If the following content appears, the RK182X dependencies have been successfully installed.
# OK3588-C development board terminal execution
# If the current user is not the root user, it is recommended to switch to the root user for execution.
root@OK3588-ubuntu22:/$ [ $(whoami) != "root" ] && sudo su -
forlinx@OK3588-ubuntu22:/# rknn-smi info
+-----------------------+---------------+---------------+----------------------+
| rknn-smi     Version: 1.1.0                                                  |
+=======================+===============+===============+======================+
| Device                | Health        | Power(mW)     | Npu(%)               |
| Chip          Name    | Bus-Id        | Temp(C)       | Memory-Usage(MB)     |
+=======================+===============+===============+======================+
| 0                     | OK            | NA            | 0                    |
| 0             RK1828  | 0000:01:00.0  | 45            | 35   / 5120          |
+=======================+===============+===============+======================+
The rknn-smi tool is used to view and manage RK182X device information:
rknn-smi -v                    # Software version
rknn-smi info -l               # Hardware info
rknn-smi info -w               # Real-time status monitoring
rknn-smi set -t work_mode -s 2 # Toggle performance mode
Operating modes: 0 = low power, 1 = balanced (default), 2 = performance (used when running benchmarks).
4. RKNN3-Toolkit: Model Conversion
4.1 Differences from RKNN-Toolkit2
Items |
RKNN-Toolkit2 |
RKNN3-Toolkit |
|---|---|---|
Platform: |
RK3566/RK3568/RK3576/RK3588 |
RK1820/RK1828 |
NPU generation |
RKNPU2 |
RKNN3 |
Python import |
|
|
Board-side Libraries |
|
|
C API Headers |
|
|
Model Output |
|
|
LLM Support |
Not supported (requires rkllm-toolkit) |
Built-in |
GitHub |
airockchip/rknn-toolkit2 |
airockchip/rknn3-toolkit |
Key Differences: The RKNN3 model export includes two files: .rknn and .weight. Both are required for deployment. For LLM model conversion, the process is now handled directly within rknn3-toolkit, and no longer requires the separate rkllm-toolkit.
4.2 CNN Model Conversion Process
Create RKNN → config() → load_onnx() → build() → export_rknn() → release()
Using YOLOv8 as an example:
To obtain the complete PyTorch example project for exporting ONNX from a custom-trained YOLOv8 project, you can download it from the following link, or use the yolov8-postprocess.tar.gz provided by the OK3588_182X_m2_AI_SDK: https://ftrg.zbox.filez.com/v2/delivery/data/95f00b0fc900458ba134f8b180b3f7a1/examples/yolov8/yolov8-postprocess.tar.gz
After downloading, follow the steps in the provided export documentation to generate an ONNX model optimized for RK182X.
Step 1: Model Acquisition
cd Projects/rknn3-model-zoo/examples/yolov8/model
./download_model.sh
Step 2: ONNX to RKNN Conversion
cd ../python
python convert.py ../model/yolov8n_rknn3.onnx RK1820 i8
Core Logic:
Example:
from rknn.api import RKNN

rknn = RKNN(verbose=True)

# Model configuration
rknn.config(mean_values=[[0, 0, 0]],
            std_values=[[255, 255, 255]],
            target_platform='RK1828',   # 或 'RK1820'

            input_attrs={'images': {'dtype': 'uint8', 'layout': 'NHWC'}},
            subgraph_dtype_target = subgraph, core_num=8,
            quantized_dtype='w8a8',
            quantized_algorithm='normal',   # normal / mmse / kl_divergence / grq / gdq
            quantized_method='channel',)

# Load the ONNX model
ret = rknn.load_onnx(model='../model/yolov8n_rknn3.onnx')

# Build (INT8 Quantification)
ret = rknn.build(do_quantization=True, dataset='../model/dataset.txt')

# Export (generates both.rknn and.weight files)
ret = rknn.export_rknn('./yolov8.rknn')

rknn.release()
Key Config Parameters:
Parameter |
Description |
|---|---|
|
|
|
|
|
Input mean |
|
Input normalized values |
|
Input attributes (dtype, layout, etc.) |
|
Set to enable performance evaluation |
4.3 LLM Model Conversion
The LLM transformation needs to export the HuggingFace model to ONNX first, and then to RKNN. The entire process is fully demonstrated in rknn3-model-zoo.
HuggingFace LLM → export ONNX + config.pkl + tokenizer.gguf + embed.bin → convert to RKNN
Using Qwen2.5 as an example:
Step 1: ONNX Export & Auxiliary File Preparation
cd Projects/rknn3-model-zoo
pip install -r requirements.txt
export PYTHONPATH=Projects/rknn3-model-zoo/

cd examples/Qwen2_5/python

python export_llm.py  # Only FP32 ONNX is exported without quantization

python export_llm.py  --quant #AWQ+GRQ quantization (GPU)

# Product: generated under model/.onnx、.config.pkl、.tokenizer.gguf、.embed.bin
File / Module
File |
Creator |
Content |
Deployed to Device? |
Description |
|---|---|---|---|---|
|
export_llm.py |
Model architecture and weights |
No |
Intermediate product, input for export_rknn.py conversion. |
|
export_llm.py |
LLM architecture config (vocab_size, hidden_size, chat_template, etc.) |
No |
Intermediate product, required by load_llm in export_rknn.py. |
|
export_llm.py |
Tokenizer (vocabulary + merge rules, GGUF format) |
Yes |
Converts text to token ID on the device side. |
|
export_llm.py |
Embedding layer weights (FP16) |
Yes |
Token → embedding executed on the host side (OK3588-C board) due to limited RK182X DRAM, not on the coprocessor. |
Step 2: Conversion to RKNN
python export_rknn.py \
  --platform RK1828 \		# or 'RK1820'
  --onnx_path ../model/llm/Qwen2.5-3B-Instruct.onnx \
  --config ../model/llm/Qwen2.5-3B-Instruct.config.pkl \
  --rknn_path ../model/llm/Qwen2.5-3B-Instruct.rknn
File / Module
|
export_rknn.py |
Compiled model architecture and instructions |
Yes |
Model file executed by the coprocessor NPU. |
|---|---|---|---|---|
|
export_rknn.py |
Compiled model weights (separated from .rknn) |
Yes |
Loaded with .rknn, part of RKNN3’s dual-file mechanism. |
Core Logic:
from rknn.api import RKNN

rknn = RKNN()

rknn.config(
    target_platform='RK1828',          # or 'RK1820'
    quantized_dtype='w4a16',           # LLM uses W4A16 quantization
    quantized_algorithm='grq'          # GRQ offers higher accuracy (requires a CUDA environment)
)
    quantized_method='group32'
)

ret = rknn.load_llm(model=onnx_path, config=config_pkl_path)

rknn.build(do_quantization=True, dataset=dataset_path)
ret = rknn.export_rknn(rknn_path)

rknn.release()
Note: GRQ quantization only supports CUDA environments and is only adapted for mainstream models (Qwen, LLaMA, MiniCPM, etc.). No CUDA environment or unsupported models can use the algorithm instead.
LLM Quantization Configuration:
Parameter |
Description |
|---|---|
|
(Weights 4-bit, Activations 16-bit) |
|
(Recommended) or |
|
(Recommended) |
4.6 VLM Model Conversion
Step 1: Model Acquisition & Conversion
A VLM consists of two independent sub-models: Vision and LLM, which are exported and converted separately.
cd Projects/rknn3-model-zoo/examples/Qwen2_5_VL/python

# Export LLM submodel
cd llm && python export_llm.py --quant && python export_rknn.py --platform RK1828

# Export Vision submodel
cd ../vision && python export_vision.py && python export_rknn.py --platform RK1828
File / Module
model/
├── llm/    Qwen2.5-VL-3B-llm.{rknn, weight, tokenizer.gguf, embed.bin}
└── vision/ Qwen2.5-VL-3B-vision.{rknn, weight}
The key difference is that Vision is loaded with the load _ onnx interface and LLM is loaded with the load _ LLM interface.
VLM models contain Vision and LLM sub-models and use different loading interfaces:
from rknn.api import RKNN

rknn = RKNN()

# --- Visual model:use load_onnx ---
rknn.config(target_platform='RK1828',	# or 'RK1820'
            quantized_dtype='w4a16', quantized_algorithm='normal',
            quantized_method='group32', core_num=8)
rknn.load_onnx(model='FastVLM-vision.onnx')
rknn.build(do_quantization=True, dataset=dataset_path)
rknn.export_rknn('FastVLM-vision.rknn')

# --- LLM model:use load_llm ---
rknn.config(target_platform='RK1828',	# or 'RK1820'
            quantized_dtype='w4a16', quantized_algorithm='grq',
            quantized_method='group32')
rknn.load_llm(model='FastVLM-llm.onnx', config='FastVLM-llm.config.pkl')
rknn.build(do_quantization=True, dataset=llm_dataset_path)
rknn.export_rknn('FastVLM-llm.rknn')
5. CNN Model Practice: YOLOv8s
This chapter uses YOLOv8s to demonstrate the complete workflow from download, conversion, deployment, to evaluation. CNN models only support C++ and Python interfaces.
5.1 Model Acquisition & Conversion
1. Download Pre-converted Model
cd Projects/rknn3-model-zoo/examples/yolov8/model
./download_model.sh
The model with the _rknn3 suffix is a version specifically optimized for RK182X, where the YOLO post-processing (decoding, NMS) is built into the coprocessor side. If you need to use custom-trained YOLOv8 weights, you can export ONNX based on the yolov8-postprocess.tar.gz project.
2. ONNX → RKNN Conversion
cd ../python
python convert.py ../model/yolov8n_rknn3.onnx RK1828 i8
Conversion product:
Key configuration:
rknn.config(
    mean_values=[[0, 0, 0]], std_values=[[255, 255, 255]],
    target_platform='RK1828',
    quantized_dtype='w8a8',
    quantized_algorithm='normal',
    core_num=8)                            # Multi-core cooperation to reduce single frame delay
rknn.load_onnx(model=onnx_path)
rknn.build(do_quantization=True, dataset='../model/dataset.txt')
rknn.export_rknn(rknn_path)
5.2 C++ Interface Deployment
1. Compilation
cd Projects/rknn3-model-zoo
export GCC_COMPILER=Projects/gcc-linaro-6.3.1-2017.05-x86_64_aarch64-linux-gnu/bin/aarch64-linux-gnu
./build-linux.sh -t rk3588 -a aarch64 -b Release -d yolov8
2. Source Code Analysis
CNN inference follows the standard RKNN3 C++ API flow:
int main(int argc, char **argv)
{
    // ==================== 1. Parse command line arguments ====================
    const char* model_path  = argv[1];    // .rknn model file
    const char* weight_path = argv[2];    // .weight weight file
    const char* image_path  = argv[3];    // Input image
    uint32_t    core_mask   = strtoul(argv[4], nullptr, 16);  // NPU core mask, e.g., 0xff = all 8 cores enabled
    const char* postprocess_plugin_path = NULL;               // Optional: post-processing plugin path (Mode A)
    if (argc == 6) {
        postprocess_plugin_path = argv[5];
    }

    // ==================== 2. Initialization ====================
    rknn_app_context_t rknn_app_ctx;
    memset(&rknn_app_ctx, 0, sizeof(rknn_app_context_t));
    init_post_process();                  // Initialize post-processing (load class labels, etc.)

    // ==================== 3. Load the model ====================
    // Internal process: rknn3_init → rknn3_load_model_from_path → rknn3_model_init → rknn3_query
    // Loads the dual files (model+weight) to the coprocessor, queries input/output attributes, and allocates memory
    ret = init_yolov8_model(model_path, weight_path, &rknn_app_ctx,
                            core_mask, postprocess_plugin_path);

    // ==================== 4. Read the image ====================
    image_buffer_t src_image;
    ret = read_image(image_path, &src_image);  // Supports jpg/png, decodes to memory

    // ==================== 5. Inference ====================
    object_detect_result_list od_results;
    // Internal process: Preprocessing (letterbox + RGA resize) → mem_sync(TO_DEVICE)
    //          → rknn3_run → mem_sync(FROM_DEVICE) → Post-processing (parse detection boxes)
    ret = inference_yolov8_model(&rknn_app_ctx, &src_image, &od_results);

    // ==================== 6. Output results ====================
    for (int i = 0; i < od_results.count; i++) {
        object_detect_result* det_result = &(od_results.results[i]);
        int x1 = det_result->box.left;
        int y1 = det_result->box.top;
        int x2 = det_result->box.right;
        int y2 = det_result->box.bottom;
        char text[256];
        sprintf(text, "%s %.2f", coco_cls_to_name(det_result->cls_id),
               det_result->box.left, det_result->box.top,
               det_result->box.right, det_result->box.bottom,
               det_result->prop);
        // Draw detection box and label
        draw_rectangle(&src_image, x1, y1, x2-x1, y2-y1, COLOR_BLUE, 3);
        draw_text(&src_image, text, x1, y1-20, COLOR_RED, 10);
    }
    write_image("out.png", &src_image);    // Save result image

    // ==================== 7. Clean up resources ====================
    deinit_post_process();
    release_yolov8_model(&rknn_app_ctx);   // Internal process: rknn3_destroy_mem + rknn3_destroy
    free(src_image.virt_addr);
}
3. Board-side Execution
adb push install/rk3588_linux_aarch64/rknn_yolov8_demo /rknn_yolov8_demo
adb shell
cd /rknn_yolov8_demo
export LD_LIBRARY_PATH=./lib:$LD_LIBRARY_PATH

./rknn_yolov8_demo ./model/yolov8n_rknn3.rknn ./model/yolov8n_rknn3.weight ./model/bus.jpg 0xff
Sample Output:
model input height=640, width=640, channel=3
Pre-process time: 3.51 ms
Inference time: 24.28 ms
Post-process time: 0.02 ms
Total time:      27.81 ms
person @ (211 242 282 507) 0.868
bus    @ ( 99 135 551 457) 0.856
person @ (478 223 560 521) 0.856
person @ (109 235 224 536) 0.853
5.3 Python Interface Deployment
The Python inference on the device board is implemented using rknn3-toolkit-lite. The lite package must first be installed on the board (refer to section 3.3 for installation methods, using the appropriate whl package for the target board).
CNN Python Inference (Device Board):
from rknnlite.api import RKNNLite
import cv2
import numpy as np

# 1. Initialize + Load (same dual files as C++)
rknn = RKNNLite()
rknn.load_rknn('./yolov8n_rknn3.rknn', weight_path='./yolov8n_rknn3.weight')
rknn.init_runtime(core_mask=RKNNLite.NPU_CORE_ALL)   # Enable all 8 cores

# 2. Preprocessing
img = cv2.imread('bus.jpg')
img_resized = cv2.resize(img, (640, 640))
input_data = np.expand_dims(img_resized, axis=0)

# 3. Inference
outputs = rknn.inference(inputs=[input_data])

# 4. Post-processing (rknn3 optimized output already in [N, 6] format)
for det in outputs[0][0]:
    x1, y1, x2, y2, score, cls = det
    if score > 0.5:
        print(f"class={int(cls)} bbox=({x1},{y1},{x2},{y2}) score={score:.3f}")

rknn.release()
Sample Output:
class=0 bbox=(211,242,282,507) score=0.868
class=5 bbox=(99,135,551,457)  score=0.856
class=0 bbox=(478,223,560,521) score=0.856
class=0 bbox=(109,235,224,536) score=0.853
5.4 Performance & Accuracy
RK Official 640×640 Data: Single-core 32.07 FPS, multi-batch multi-core 210.73 FPS.
Accuracy Comparison (COCO val2017, YOLOv8s)
Model |
FP32 AP@0.5 |
RKNN3 W8A8 AP@0.5 |
Accuracy Drop |
|---|---|---|---|
YOLOv8s |
0.525 |
0.517 |
-1.5% |
6. LLM Model Practice: Qwen2.5-3B
This chapter uses Qwen2.5-3B-Instruct to demonstrate the complete LLM model deployment workflow LLM supports C++, Python, and OpenAI interfaces.
6.1 Model Acquisition & Conversion
1. Export ONNX + Supporting Files
cd Projects/rknn3-model-zoo
pip install -r requirements.txt
export PYTHONPATH=$(pwd)

cd examples/Qwen2_5/python
python export_llm.py --quant       # --quant Enable AWQ + GRQ quantization(require CUDA)
Output:Qwen2.5-3B-Instruct.onnx + .config.pkl + .tokenizer.gguf + .embed.bin。
AWQ+GRQ quantization offers higher accuracy and does not require a calibration dataset for RKNN conversion. 3B model conversion is recommended with 24GB+ physical RAM + GPU.
2. ONNX → RKNN Conversion
python export_rknn.py \
  --platform RK1828 \
  --onnx_path ../model/llm/Qwen2.5-3B-Instruct.onnx \
  --config ../model/llm/Qwen2.5-3B-Instruct.config.pkl \
  --rknn_path ../model/llm/Qwen2.5-3B-Instruct.rknn
6.2 C++ Interface Deployment
1. Compilation
cd Projects/rknn3-model-zoo
./build-linux.sh -t rk3588 -a aarch64 -b Release -d Qwen2_5
2. Source Code Analysis
LLM deployment introduces callback-driven execution:
int main(int argc, char **argv)
{
// ==================== 1. Parse Command Line Arguments ====================
const char *model_path = argv[1]; // .rknn model file
const char *weight_path = argv[2]; // .weight weight file
const char *tokenizer_path = argv[3]; // .tokenizer.gguf tokenizer
const char *embedding_path = argv[4]; // .embed.bin embedding weights
uint32_t core_mask = strtoul(argv[5], nullptr, 16); // NPU core mask
const char *prompt = argv[6]; // User input
// ==================== 2. Load Tokenizer ====================
// Uses llama.cpp's GGUF tokenizer for text ↔ token ID conversion
Tokenizer* tokenizer = new Tokenizer(TOKENIZER_BACKEND_LLAMA, tokenizer_path);
tokenizer->GetVocabInfo(&vocab_info);
// Retrieves vocab_size, special_eos_id, special_bos_id, etc.
// ==================== 3. Load Embedding ====================
// Maps embed.bin to memory (Host side) via mmap to avoid copying large files
// RK182X has limited DRAM, so embedding layer runs on RK3588 Host side
embedding_info.fd = open(embedding_path, O_RDONLY);
embedding_info.embedding_data = (float16*)mmap(NULL, file_size, PROT_READ, MAP_PRIVATE, fd, 0);
embedding_info.embedding_dim = (file_size / vocab_size) / sizeof(float16);
// ==================== 4. Configure LLM Parameters ====================
rknn3_llm_param params = {0};
params.logits_name = "logits"; // Output node name
params.max_context_len = MAX_CONTEXT_LEN; // Maximum context length
params.sampling_param = { // Sampling parameters
.top_k = 1,
.top_p = 0.9,
.temperature = 1.0f,
.repeat_penalty = 1.2f,
.frequency_penalty = 0.0f,
.presence_penalty = 0.0f
};
// Vocabulary information (EOS/BOS token IDs, etc.)
params.vocab_info.vocab_size = vocab_info.vocab_size;
memcpy(params.vocab_info.special_eos_id, vocab_info.special_eos_id, ...);
// ==================== 5. Register Callback Functions ====================
RKLLMCallback callback = {0};
// result_callback: Receives each generated token, decodes it into text, and streams output
callback.result_callback = result_callback;
callback.result_userdata = tokenizer;
// tokenizer_callback: Encodes input text into token ID sequences
callback.tokenizer_callback = tokenizer_callback;
callback.tokenizer_userdata = tokenizer;
// embed_callback: Converts token IDs to embedding vectors via lookup (Host side execution)
// Internally uses memcpy to copy corresponding rows from mmap-ed embed.bin indexed by token ID
callback.embed_callback = embed_callback;
callback.embed_userdata = &embedding_info;
// ==================== 6. Initialize Model ====================
// Internally performs: rknn3_init → rknn3_load_model_from_path → rknn3_model_init
// → rknn3_session_init → rknn3_session_set_chat_template
// → rknn3_session_set_callback
init_qwen2_5_llm(&rknn_app_ctx, model_path, weight_path,
¶ms, 1, callback, core_mask);
// ==================== 7. Assemble Input and Perform Inference ====================
rknn3_llm_tensor tensor = {0};
tensor.name = "input_embeds";
tensor.prompt = prompt; // User input text
tensor.embed = NULL; // Embedding not directly passed; generated by callback
tensor.tokens = NULL;
tensor.n_tokens = 0;
tensor.enable_thinking = false; // Disable thinking mode
// Internally performs: rknn3_session_run → Triggers callback chain:
// tokenizer_callback(text→tokens) → embed_callback(tokens→embedding)
// → NPU inference → result_callback(stream output generated text)
inference_qwen2_5_llm(&rknn_app_ctx, tensor, 1, &perf);
// ==================== 8. Output Performance Metrics ====================
// Prefill: TTFT (Time To First Token), token processing speed
// Generate: Decode TPS (Tokens Per Second)
printf_perf(&perf);
// ==================== 9. Clean Up Resources ====================
release_qwen2_5_llm(&rknn_app_ctx); // rknn3_session_destroy + rknn3_destroy
munmap(embedding_info.embedding_data, file_size); // Release mmap
close(embedding_info.fd);
delete tokenizer;
}
3. Board-side Execution
adb push install/rk3588_linux_aarch64/rknn_Qwen2_5_demo/ /rknn_Qwen2_5_demo/
adb shell
cd /rknn_Qwen2_5_demo

./rknn_qwen2_5_demo \
    model/Qwen2.5-3B-Instruct.rknn \
    model/Qwen2.5-3B-Instruct.weight \
    model/Qwen2.5-3B-Instruct.tokenizer.gguf \
    model/Qwen2.5-3B-Instruct.embed.bin \
    0xff "Who are you?"
Sample Output:
I am Qwen, an AI assistant created by Alibaba Cloud...
TTFT: 83.4 ms | Decode TPS: 102.0 tokens/s
6.3 Python Interface Deployment
from rknn3lite.api import RKNN3Lite

# 1. Initialization (LLM mode)
rknn_llm = RKNN3Lite(llm_mode=True)

# 2. Load model
rknn_llm.load_rknn(model_path='Qwen2.5-3B-Instruct.rknn',
                   weight_path='Qwen2.5-3B-Instruct.weight')

# 3. Initialize runtime (with LLM parameters and callbacks)
ARGS = [{"max_new_tokens": 256, "top_k": 1, "repeat_penalty": 1.1,
         "special_eos_id": 151645, "max_context_len": 1024}]
callback = RKLLMCallback()
# ... configure callback functions ...

rknn_llm.init_runtime(target='rk1828', core_mask=0xff,
                      llm_args=ARGS, llm_callback=callback,
                      llm_embed_path='Qwen2.5-3B-Instruct.embed.bin')

# 4. Inference
prompt = "Who are you?"
ret, [n_decode, n_prefill, t_start, t_end] = rknn_llm.session_run(prompt=prompt)

# 5. Release resources
rknn_llm.release()
6.4 OpenAI Interface Deployment(rkllm3-server)
rkllm3-server starts an HTTP service on the board, providing an interface compatible with the OpenAI ChatGPT API format. Any language or tool that supports HTTP requests can remotely call the board-side model without writing C++ code. Existing OpenAI ecosystem tools (e.g., LangChain, ChatUI, Python openai library) can be directly connected by simply pointing the api_base to the board’s IP address.
Start the Server
adb shell
cd /Qwen2.5-3B
rkllm3-server -m model/Qwen2.5-3B-Instruct.rknn \
  --weight model/Qwen2.5-3B-Instruct.weight \
  --vocab model/Qwen2.5-3B-Instruct.tokenizer.gguf \
  --embed model/Qwen2.5-3B-Instruct.embed.bin \
  --host 0.0.0.0 --port 8080 \
  -c 1024 --n_predict 512 \
  --top-k 1 --top-p 0.8 --temp 0.8
curl Call (Run in another terminal on the board)
curl http://localhost:8080/v1/chat/completions \
  -H "Content-Type: application/json" \
  -d '{
    "messages": [{"role":"user","content":"Hello,please introduce yourself"}],
    "max_tokens": 256
  }'
Results:

If testing remotely from a PC, replace localhost with the board IP.
curl http://:8080/v1/chat/completions \
  -H "Content-Type: application/json" \
  -d '{
    "messages": [{"role":"user","content":"你好,请介绍一下你自己"}],
    "max_tokens": 256
  }'
The returned JSON includes content and tokens_per_sec (measured at about 102 TPS).
Python openai Library Call
from openai import OpenAI

client = OpenAI(base_url="http://:8080/v1", api_key="sk-no-key-required")
resp = client.chat.completions.create(
    model="Qwen2.5-3B",
    messages=[{"role": "user", "content": "Who are you?"}],
    stream=True
)
for chunk in resp:
    if chunk.choices[0].delta.content:
        print(chunk.choices[0].delta.content, end='', flush=True)
6.5 Performance & Accuracy
Model |
TTFT (ms) |
TPOT (ms) |
Decode TPS |
Data Collection |
FP32 |
RKNN3 W4A16 |
|---|---|---|---|---|---|---|
Qwen2.5-0.5B |
21.89 |
4.63 |
215.86 |
gsm8k |
40.71 |
36.09 |
Qwen2.5-3B |
83.44 |
9.80 |
102.01 |
gsm8k |
79.91 |
80.52 |
7. VLM Model in Practice: Qwen2.5-VL-3B
This chapter uses Qwen2.5-VL-3B as an example to demonstrate the complete deployment workflow of a VLM multimodal model. VLM also supports three interfaces: C++, Python, and OpenAI.
7.1 Model Acquisition & Conversion
A VLM consists of two independent sub-models: Vision and LLM, which are exported and converted separately.
cd Projects/rknn3-model-zoo/examples/Qwen2_5_VL/python

# Export LLM submodel
cd llm && python export_llm.py --quant && python export_rknn.py

# Export Vision submodel
cd ../vision && python export_vision.py && python export_rknn.py
File / Module
model/
├── llm/    Qwen2.5-VL-3B-llm.{rknn, weight, tokenizer.gguf, embed.bin}
└── vision/ Qwen2.5-VL-3B-vision.{rknn, weight}
Vision models use the
load_onnxinterface for loading, while LLMs use theload_llminterface. This is the key distinction.
7.2 C++ Interface Deployment
Compile & Deploy
./build-linux.sh -t rk3588 -a aarch64 -b Release -d Qwen2_5_VL
adb push install/rk3588_linux_aarch64/rknn_Qwen2_5_VL_demo /rknn_Qwen2_5_VL_demo
Source Code Analysis (examples/Qwen2_5_VL/cpp):
The VLM (Vision-Language Model) inference is encapsulated within inference_qwen2_5_vl_model(). Internally, it first processes the image through the Vision model to obtain img_embeds, then combines img_embeds with the prompt before feeding it to the LLM Session for multimodal generation:
// ==================== 2. Load Tokenizer + Embedding ====================
// Identical to LLM: GGUF tokenizer + mmap embed.bin
Tokenizer* tokenizer = new Tokenizer(TOKENIZER_BACKEND_LLAMA, tokenizer_path);
tokenizer->GetVocabInfo(&vocab_info);
embedding_info.fd = open(embedding_path, O_RDONLY);
embedding_info.embedding_data = (float16*)mmap(NULL, file_size, PROT_READ, MAP_PRIVATE, fd, 0);
embedding_info.embedding_dim = (file_size / vocab_size) / sizeof(float16);
// ==================== 3. Configure LLM Parameters + Callback ====================
// Same params and callback settings as LLM
rknn3_llm_param params = {0};
params.logits_name = "logits";
params.max_context_len = MAX_CONTEXT_LEN;
params.sampling_param = {
.top_k = 1, .top_p = 0.9,
.temperature = 0.000001f, // VLM uses very low temperature for more deterministic output
.repeat_penalty = 1.05f
};
RKLLMCallback callback = {0};
callback.result_callback = result_callback; // Stream output text
callback.tokenizer_callback = tokenizer_callback; // Text → token
callback.embed_callback = embed_callback; // Token → embedding
// ==================== 4. Initialize Vision + LLM Dual Models ====================
// Key difference from LLM: Load both Vision and LLM models simultaneously
// Internal process:
// Vision: rknn3_init → rknn3_load_model → rknn3_model_init → rknn3_query
// LLM: rknn3_init → rknn3_load_model → rknn3_session_init → set_callback
init_qwen2_5_vl_model(&rknn_app_ctx,
llm_model_path, llm_weight_path,
vision_model_path, vision_weight_path,
¶ms, 1, callback,
vision_core_mask, llm_core_mask);
// ==================== 5. Allocate img_embeds Memory ====================
// Allocate embedding buffer based on the output shape of the Vision model
size_t embed_elems = 1;
for (size_t i = 0; i < rknn_app_ctx.vision.embeds_ndims; i++) {
embed_elems *= rknn_app_ctx.vision.embeds_shape[i];
}
float16* img_embeds = (float16*)malloc(embed_elems * sizeof(float16));
// ==================== 6. Preprocess Input Image ====================
// Load image via standard image processing library
cv::Mat img = cv::imread(img_path);
// Resize to the model's required input dimensions
cv::resize(img, img, cv::Size(model_width, model_height));
// Image data format conversion: BGR -> RGB
cv::cvtColor(img, img, cv::COLOR_BGR2RGB);
// Prepare image tensor for rknn3
src_image.width = model_width;
src_image.height = model_height;
src_image.channel = 3;
src_image.format = IMAGE_FORMAT_RGB888;
src_image.virt_addr = (uint8_t*)malloc(model_width * model_height * 3);
memcpy(src_image.virt_addr, img.data, model_width * model_height * 3);
// ==================== 7. Construct Prompt with Image ====================
// Prepend <|image|> special token to indicate image input
prompt_with_image = " " + std::string(prompt);
tensor.prompt = prompt_with_image.c_str();
// Image embedding information
tensor.image.image_embed = img_embeds;
// Automatically determine token count based on Vision output dimensions
if (rknn_app_ctx.vision.embeds_ndims == 2) {
tensor.image.n_image_tokens = rknn_app_ctx.vision.embeds_shape[0];
tensor.image.n_image = 1;
} else {
tensor.image.n_image_tokens = rknn_app_ctx.vision.embeds_shape[1];
tensor.image.n_image = rknn_app_ctx.vision.embeds_shape[0];
}
tensor.image.image_width = rknn_app_ctx.vision.model_width;
tensor.image.image_height = rknn_app_ctx.vision.model_height;
// Qwen2.5-VL image token markers
tensor.image.image_start = "";
tensor.image.image_end = "";
tensor.image.image_content = "";
tensor.enable_thinking = false;
// ==================== 8. Inference ====================
// Internal process:
// 1) Vision inference: Preprocess image → rknn3_run → output img_embeds
// 2) LLM inference: Combine prompt + img_embeds → rknn3_session_run
// → Callback chain: tokenizer → embed → NPU → result (streaming output)
inference_qwen2_5_vl_model(&rknn_app_ctx, &src_image, img_embeds,
tensor, 1, &perf);
// ==================== 9. Output Performance Metrics ====================
// Besides Prefill/Generate, also output Vision latency
printf_perf(&perf);
// Example output: Vision latency = 274.80 ms, FPS = 3.64
// ==================== 10. Clean Up Resources ====================
release_qwen2_5_vl_model(&rknn_app_ctx); // Release Vision + LLM dual models
munmap(embedding_info.embedding_data, file_size);
close(embedding_info.fd);
free(src_image.virt_addr);
free(img_embeds);
delete tokenizer;
3) Run
./rknn_qwen2_5_vl_demo \
  ./model/Qwen2.5-VL-3B-vision.rknn \
  ./model/Qwen2.5-VL-3B-vision.weight \
  ./model/Qwen2.5-VL-3B-llm.rknn \
  ./model/Qwen2.5-VL-3B-llm.weight \
  ./model/Qwen2.5-VL-3B-llm.tokenizer.gguf \
  ./model/Qwen2.5-VL-3B-llm.embed.bin \
  0xff 0xff \
  ./model/demo.jpg \
  "Please describe this picture" 392 392
7.3 VLM Python Inference (On-device)
from rknn3lite.api import RKNN3Lite, RKNN3Image
import numpy as np
import ctypes

# 1. Vision model inference (normal mode)
rknn_vision = RKNN3Lite()
rknn_vision.load_rknn(model_path='Qwen2.5-VL-3B-vision.rknn',
                      weight_path='Qwen2.5-VL-3B-vision.weight')
rknn_vision.init_runtime(target='rk1828', core_mask=0xff)

outputs = rknn_vision.inference(inputs=[feature])
img_embeds = np.float16(np.expand_dims(outputs[0], 0))

# 2. LLM model inference (LLM mode)
rknn_llm = RKNN3Lite(llm_mode=True)
rknn_llm.load_rknn(model_path='Qwen2.5-VL-3B-llm.rknn',
                   weight_path='Qwen2.5-VL-3B-llm.weight')
rknn_llm.init_runtime(target='rk1828', core_mask=0xff,
                      llm_args=ARGS, llm_callback=callback,
                      llm_embed_path='Qwen2.5-VL-3B-llm.embed.bin')

# 3. Assemble multimodal input
llm_input = RKNN3Image()
llm_input.image_embed    = img_embeds.ctypes.data_as(ctypes.POINTER(Float16))
llm_input.n_image_tokens = img_embeds.shape[1]
llm_input.n_image        = img_embeds.shape[0]
llm_input.image_width    = 392
llm_input.image_height   = 392
llm_input.image_start    = "".encode('utf-8')
llm_input.image_end      = "".encode('utf-8')
llm_input.image_content  = "".encode('utf-8')

# 4. Inference
prompt = "Please describe this image"
ret, stats = rknn_llm.session_run(inputs=[llm_input], prompt=prompt)

# 5. Release
rknn_vision.release()
rknn_llm.release()
7.4 OpenAI Interface Deployment
Start the Server
rkllm3-server -m model/Qwen2.5-VL-3B-llm.rknn \
  --model2 model/Qwen2.5-VL-3B-vision.rknn \
  --vocab model/Qwen2.5-VL-3B-llm.tokenizer.gguf \
  --embed model/Qwen2.5-VL-3B-llm.embed.bin \
  --host 0.0.0.0 --port 8080 \
  -c 768 --n_predict 512 \
  --top-k 1 --top-p 0.8 --temp 0.8 \
  --img-start "" --img-end "" \
  --img-content "" \
  --img-width 392 --img-height 392
First, test with plain text to confirm the server is functioning correctly.
curl http://localhost:8080/v1/chat/completions \
  -H "Content-Type: application/json" \
  -d '{"messages":[{"role":"user","content":"你好"}],"max_tokens":64}'
Results:

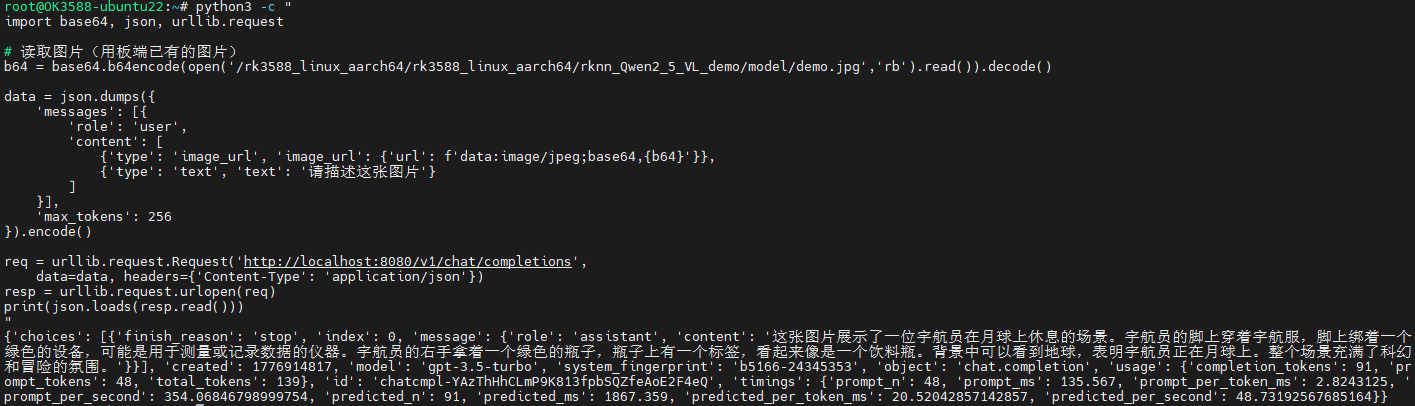
In another terminal, use Python to send an image + text request:
# First, convert the test image to base64
python3 -c "
import base64, json, urllib.request

# Read image (using an existing image on the board)
b64 = base64.b64encode(open('/rk3588_linux_aarch64/rk3588_linux_aarch64/rknn_Qwen2_5_VL_demo/model/demo.jpg','rb').read()).decode()

data = json.dumps({
    'messages': [{
        'role': 'user',
        'content': [
            {'type': 'image_url', 'image_url': {'url': f'data:image/jpeg;base64,{b64}'}},
            {'type': 'text', 'text': '请描述这张图片'}
        ]
    }],
    'max_tokens': 256
}).encode()

req = urllib.request.Request('http://localhost:8080/v1/chat/completions',
    data=data, headers={'Content-Type': 'application/json'})
resp = urllib.request.urlopen(req)
print(json.loads(resp.read()))
"
Results:
7.5 Performance Data
Model |
Acceleration Chip |
Vision (ms) |
LLM TTFT (ms) |
LLM Decode TPS |
|---|---|---|---|---|
Qwen2.5-VL-3B |
RK1828 |
274.80 |
84.69 |
102.58 |
Qwen2.5-VL-7B |
RK1828 |
279.34 |
159.42 |
70.02 |
8. RKNN3 C API Quick Reference
CNN Deployment Core API Quick Reference Detailed parameter descriptions can be found in.
Function |
Function |
|---|---|
|
Initialize Context |
|
Load model + weight from a file. |
|
Load model from Memory |
|
Model Initialization Configure settings (e.g., core_mask). |
|
Query Input/Output Attributes Get IN_OUT_NUM, INPUT_ATTR, OUTPUT_ATTR. |
|
Allocate memory for input/output tensors. |
|
Host ↔ Device Memory Sync (TO_DEVICE / FROM_DEVICE) |
|
Synchronous Inference |
|
Release allocated tensor memory. |
|
Destroy Context |
See Section 5.2 for a complete code example.
9. LLM Session API Quick Reference
Quick reference for LLM/VLM deployment Session API.
Function |
Function |
|---|---|
|
Create Session |
|
Set system prompt + prefix + postfix |
|
Register 5 callback functions |
|
Synchronous Inference |
|
Asynchronous reasoning |
|
Terminate the current inference |
|
Clean KVCache |
|
Destroy Session |
5 callback functions:
Callback |
Phase |
Function |
Mandatory |
|---|---|---|---|
|
Prefill |
Context→ Token |
Optional |
|
Prefill + Decode |
Token → Embedding(Host Execute) |
Yes |
|
Prefill + Decode |
Retrieve the model output |
Optional |
|
Prefill + Decode |
Logits → Token |
Optional |
|
Prefill + Decode |
Token streaming output |
Yes |
See Section 6.2 for a complete code example.
10. Supported Models and Performance Data
10.1 Supported Model
LLM:Qwen2.5 (0.5B/1.5B/3B/7B), Qwen3 (0.6B/1.7B/4B/8B), HY-MT1.5-1.8B, Youtu-LLM-2B, GLM-Edge-1.5B-Chat
VLM:FastVLM, Qwen2.5-VL (3B/7B), Qwen3-VL (2B/4B), InternVL3 (2B), InternVL3.5 (4B), MiMo-VL-7B-RL, SmolVLM-500M, UI-TARS-2B-SFT, gme-Qwen2-VL-2B
Full-modality : Qwen2.5-Omni-3B (Thinker)
CNN:MobileNetV1, MobileNetV2, ResNet50V2, YOLOv5s, YOLOv6s, YOLOv8s
Others:SenseVoiceSmall(voice), Depth-Anything-V2-small(depth estimation), Siglip2-so400m, Dinov3
Pre-conversion model download: RKNN3 _ SDK network disk (https://console.box.lenovo.com/l/H1fig1, extraction code: rknn),
path: RKNN3_SDK/rknn3_models/v1.0.0.
10.2 LLM Performance
Test conditions: OK3588-C development board + RK182X, PCIe connection, performance mode, Input/New Tokens are 128.
Model |
Acceleration Chip |
TTFT (ms) |
TPOT (ms) |
Decode TPS |
|---|---|---|---|---|
Qwen2.5-0.5B |
RK182X |
21.89 |
4.63 |
215.86 |
Qwen2.5-1.5B |
RK182X |
47.47 |
6.78 |
147.56 |
Qwen2.5-3B |
RK182X |
83.44 |
9.80 |
102.01 |
Qwen2.5-7B |
RK1828 |
158.06 |
14.23 |
70.26 |
Qwen3-0.6B |
RK182X |
27.53 |
5.58 |
179.33 |
Qwen3-1.7B |
RK1828 |
52.16 |
7.20 |
138.88 |
Qwen3-4B |
RK1828 |
106.70 |
11.42 |
87.56 |
Qwen3-8B |
RK1828 |
177.87 |
16.36 |
61.11 |
TTFT: First token generation time, TPOT: Average time per output token, TPS: Tokens generated per second
10.3 VLM Performance
Model |
Acceleration Chip |
Vision Resolution |
Vision (ms) |
LLM TTFT (ms) |
LLM Decode TPS |
|---|---|---|---|---|---|
FastVLM_1.5B |
RK182X |
512×512 |
144.13 |
47.99 |
148.47 |
InternVL3-2B |
RK182X |
448×448 |
190.80 |
47.93 |
148.26 |
Qwen2.5-VL-3B |
RK1828 |
392×392 |
274.80 |
84.69 |
102.58 |
Qwen2.5-VL-7B |
RK1828 |
392×392 |
279.34 |
159.42 |
70.02 |
Qwen3-VL-2B |
RK182X |
384×384 |
155.33 |
53.39 |
142.37 |
Qwen3-VL-4B |
RK1828 |
384×384 |
158.89 |
108.29 |
89.69 |
10.4 CNN Performance
Model |
Resolution |
Single-core frame rate |
Multi-batch multi-core frame rate |
|---|---|---|---|
MobileNetV1 |
224×224 |
384.97 |
1505.06 |
MobileNetV2 |
224×224 |
280.06 |
1319.91 |
ResNet50V2 |
224×224 |
113.66 |
851.34 |
YOLOv5s |
640×640 |
35.41 |
212.65 |
YOLOv6s |
640×640 |
29.33 |
194.70 |
YOLOv8s |
640×640 |
32.07 |
210.73 |
10.5 Model Accuracy
LLM (W4A16 G32 quantization, gsm8k dataset):
Model |
Original FP32 |
RKNN3 W4A16 |
|---|---|---|
Qwen2.5-0.5B |
40.71 |
36.09 |
Qwen2.5-3B |
79.91 |
80.52 |
Qwen3-4B |
90.6 |
89.84 |
CNN(W8A8 quantization, ImageNet):
Model |
FP32 TOP1 |
RKNN3 W8A8 TOP1 |
|---|---|---|
MobileNetV1 |
0.677 |
0.676 |
MobileNetV2 |
0.694 |
0.680 |
ResNet50V2 |
0.729 |
0.721 |
Detection (W8A8 Quantification, COCO2017):
Model |
FP32 AP@0.5 |
RKNN3 W8A8 AP@0.5 |
|---|---|---|
YOLOv5s |
0.481 |
0.474 |
YOLOv6s |
0.551 |
0.533 |
YOLOv8s |
0.525 |
0.517 |
11. Common Issues
rknn-smi reports “Failed to initialize rknnsmi”
This is a co-processor initialization timing issue. Edit /lib/systemd/system/rknn3.service and add ExecStartPre=/bin/sleep 3 in the [Service] section. Then run systemctl daemon-reload && systemctl restart rknn3.service.
rknn3_transfer_proxy devices cannot detect the device
Check PCIe/USB connections, reseat if necessary, and confirm that the co-processor firmware is loaded correctly (dmesg | grep pcie-rkep).
“Unsupported target platform” during model conversion
Ensure you are using rknn3-toolkit (not rknn-toolkit2) and set target_platform to either 'RK1820' or 'RK1828'.
rknn3-model-zoo reports “No module named ‘py_utils’”
Environment variables not set. Execute export PYTHONPATH=:$PYTHONPATH.
GRQ quantization failed
GRQ requires a CUDA environment and only supports mainstream models. If unsupported, switch to quantized_algorithm='normal'.
No performance advantage for CV models on RK182X
This is expected behavior. CNN models are compute-bound, and the built-in NPU in RK3588 is already sufficient. The value of RK182X lies in LLM/VLM scenarios.
12. Appendix
12.1 Glossary
Glossary |
Description |
|---|---|
TTFT |
Time To First Token, generation time of first token. |
TPOT |
Time Per Output Token, average time per generated token |
TPS |
Tokens Per Second, tokens generated per second |
W4A16 |
Weights 4-bit, Activations 16-bit quantization |
W8A8 |
Weights 8-bit, Activations 8-bit quantization |
GRQ |
Group Quantization, Group Quantization algorithm |
KVCache |
Key-Value Cache, caching attention keys and values in LLM inference |
Session |
Session object in RKNN3 managing LLM context and inference state |
3D RAM Stacking |
3D stacking packaging technology with DRAM and processor dies |
core_mask |
Bitmask specifying which NPU cores to use (e.g., 0xff for all 8 cores) |
12.2 Reference Documents
Document |
Description |
|---|---|
Rockchip_RKNPU_API_Reference_RKNN3_Toolkit_CN.pdf |
Model Transformation API Detail |
Rockchip_RKNPU_API_Reference_RKNNRT3_CN.pdf |
RKNN3 C API Detail |
Rockchip_User_Guide_RKNN-SMI_Tool_EN.pdf |
rknn-smi Tool Usage Guide |
12.3 Reference Links
Resource |
Link |
|---|---|
rknn3-toolkit |
|
rknn3-model-zoo |
|
Pre-converted Model Downloads |
https://console.box.lenovo.com/l/H1fig1(Extraction Code: rknn) |