Linux 6.1.141 User Manual V1.0
Document classification: □ Top secret □ Secret □ Internal information ■ Open
Copyright
The copyright of this manual belongs to Baoding Folinx Embedded Technology Co., Ltd. Without the written permission of our company, no organizations or individuals have the right to copy, distribute, or reproduce any part of this manual in any form, and violators will be held legally responsible.
Forlinx adheres to copyrights of all graphics and texts used in all publications in original or license-free forms.
The drivers and utilities used for the components are subject to the copyrights of the respective manufacturers. The license conditions of the respective manufacturer are to be adhered to. Related license expenses for the operating system and applications should be calculated/declared separately by the related party or its representatives.
1. Product Overview
The FCU3101 embedded control unit is built around the FET1126B-S / FET1126BJ-S SoM. It runs a quad-core 64-bit Arm Cortex-A53 at up to 1.6 GHz, integrates NEON, FPU, NPU, and MCU blocks, and delivers up to 3.0 TOPS of NPU compute — enough for lightweight on-device AI. Memory and storage scale up to 4 GB and 64 GB respectively.
The product uses a SoM-plus-carrier-board architecture and offers a rich set of interfaces: Ethernet, Wi-Fi, 4G, RTC, DI, DO, RS-485, RS-232, USB 3.0, and HDMI, among others. It is the first product in the Forlinx family design language and includes a programmable LED strip. Dimensions: 202 mm (L) × 123 mm (W) × 42 mm (H).
Typical applications include intelligent security and surveillance, in-vehicle vision and smart transportation, smart home and consumer electronics, and industrial vision and energy inspection.
1.1 Hardware Specifications
The base configuration of the FCU3101 is listed below.
Item |
Specification |
|---|---|
CPU |
Rockchip RV1126B / RV1126BJ, Arm Cortex-A53 at 1.6 GHz |
RAM |
Up to 4 GB |
ROM |
eMMC, up to 64 GB |
HDMI OUT |
Max. resolution 1920×1080 |
USB |
USB 2.0 HOST + USB 3.0 HOST |
Ethernet |
1 × 10/100/1000 Mbps auto-negotiating + 1 × 10/100 Mbps auto-negotiating |
DO |
2 x, digital output, contact rating 5 A @ 30 VDC |
DI |
2 x, digital input, dry contact |
RS-232 |
2 x, 115200 bps |
RS-485 |
2 x, 115200 bps |
Power input |
24 VDC nominal, wide input 9–36 VDC, reverse-polarity and over-current protection |
DEBUG |
USB-to-serial debugging, CH340 driver |
TF card |
Expandable up to 128 GB |
Audio |
3.5 mm AUX, analog audio output |
4G |
Quectel EC20 module supported by default |
Wi-Fi & Bluetooth |
Wi-Fi 4 + BT 4.2; Wi-Fi supports STA and AP modes |
RTC |
Real-time clock |
Indicators |
4 LEDs: power, system running, and two user-definable LEDs |
Light strip |
Exterior status LED strip |
Dimensions |
202 × 123 × 42 mm (L × W × H) |
Mounting |
Desktop or ear mounting |
EMC |
Level 3 EMC protection |
1.2 Software Specifications
Item |
Description |
|---|---|
Operating system |
Linux 6.1.141 |
GCC |
12.4.0 |
RS-485 / RS-232 |
RS-485 test example provided |
Network protocols |
TCP/IP, UDP, DHCP, TFTP, FTP, SSH, Web, Nginx, HTTP, iptables, SQLite |
Ethernet |
100/1000 Mbps auto-negotiating; static or dynamic IP; MAC address configurable |
Wi-Fi |
STA and AP modes |
Bluetooth |
Test example provided |
4G (optional) |
4G data via China Mobile, China Unicom, or China Telecom |
RTC |
NTP time synchronization; clock retained when power is removed |
Watchdog |
Reset timeout configurable |
Buzzer |
Test example provided |
Python |
Test example provided |
Qt |
Qt 5.15.11 libraries provided |
1.3 Enclosure Dimensions
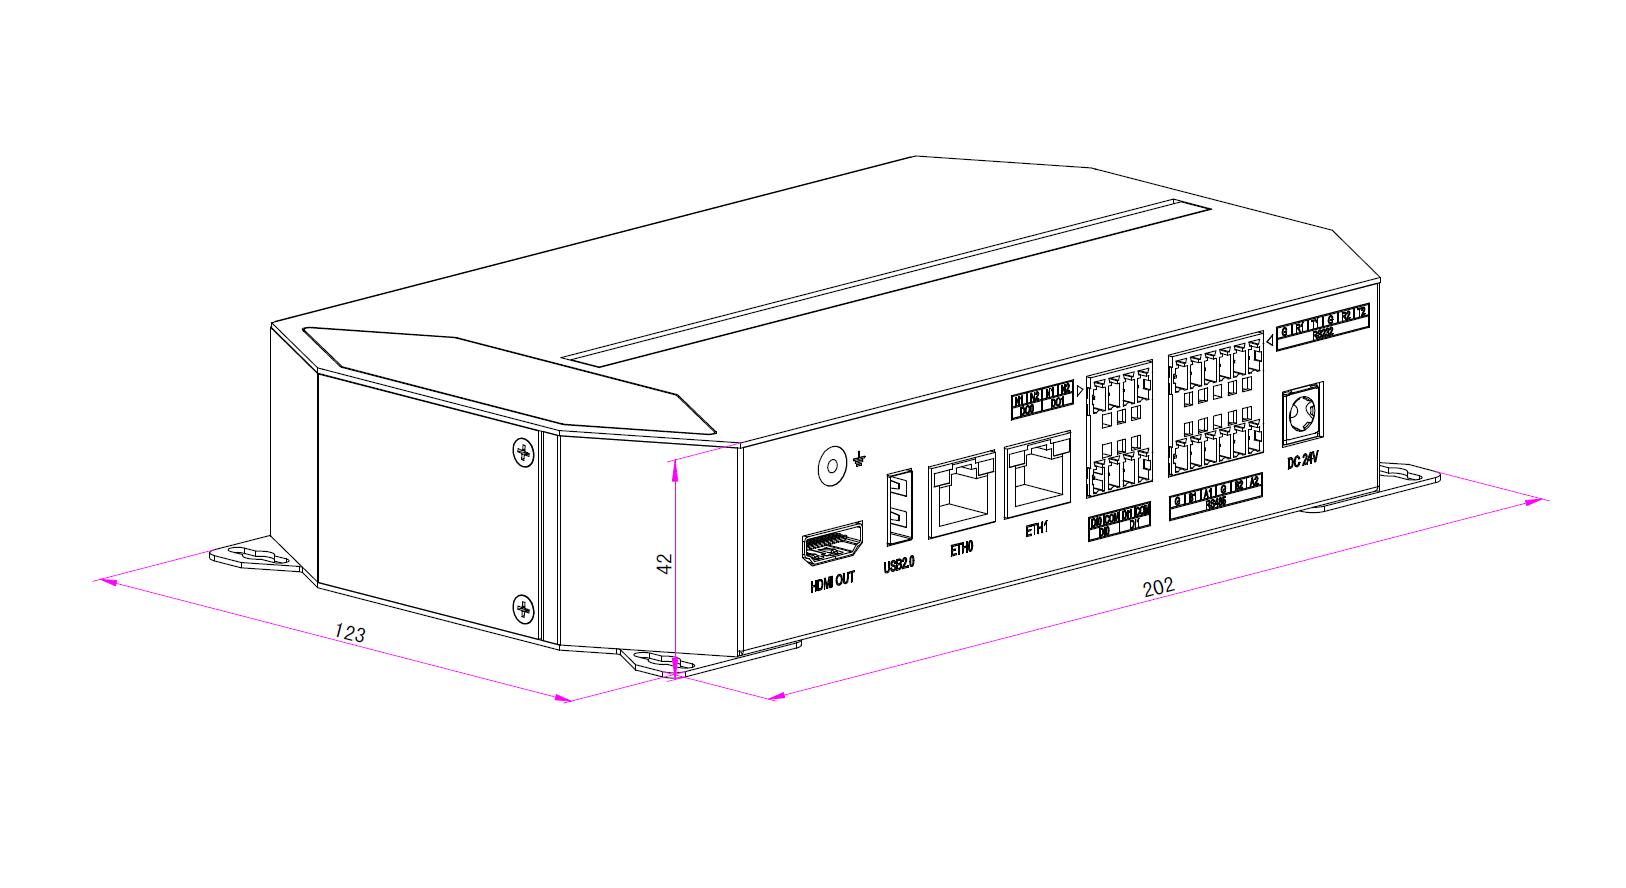
L: 202 mm · W: 123 mm · H: 42 mm
2. Product Features
2.1 Interface Overview
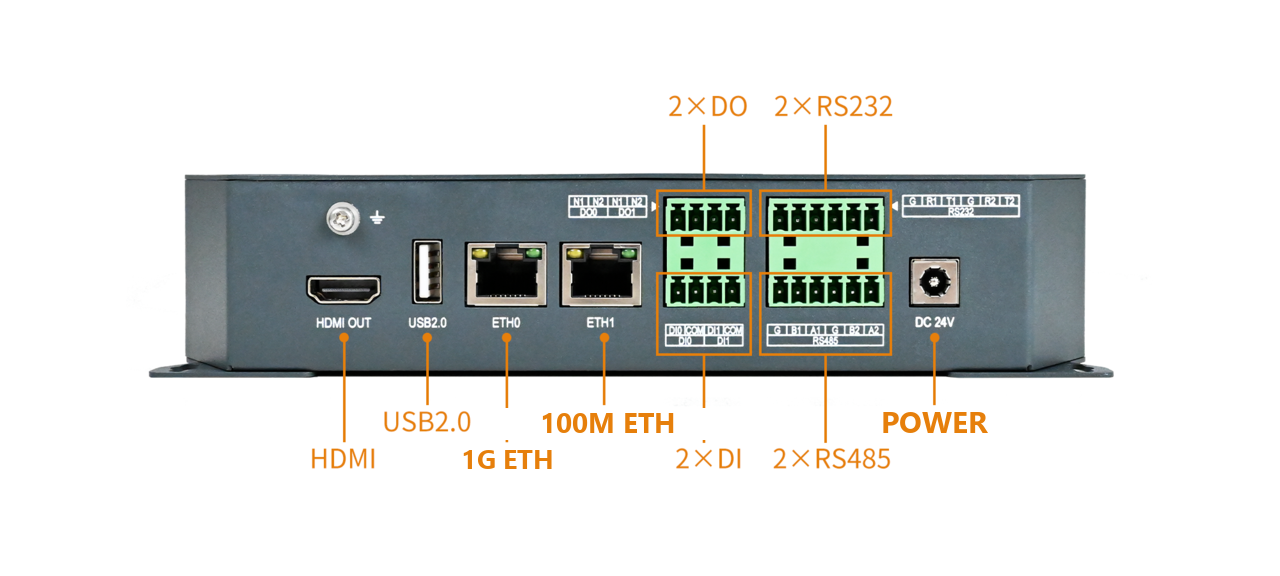
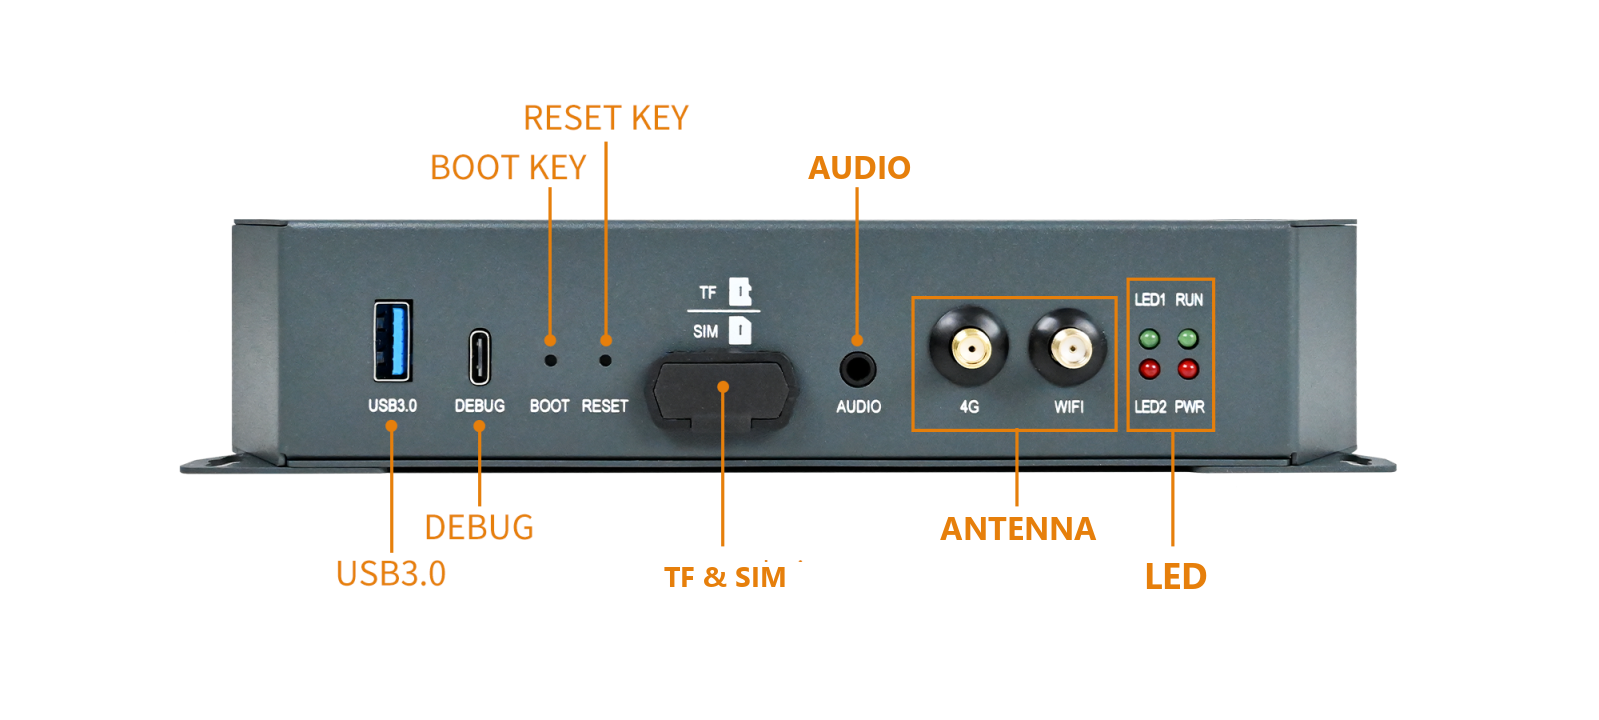
FCU3101 Interface Overview:
No. |
Interface |
Description |
|---|---|---|
1 |
HDMI |
HDMI OUT, video output |
2 |
USB 2.0 |
USB 2.0 HOST port |
3 |
Gigabit Ethernet |
ETH0, 10/100/1000 Mbps |
4 |
Fast Ethernet |
ETH1, 10/100 Mbps |
5 |
DI & DO |
Digital input/output |
6 |
RS-485 & RS-232 |
Serial communication |
7 |
Power |
24 VDC input |
8 |
USB 3.0 |
USB 3.0 HOST port |
9 |
DEBUG |
USB Type-C debug port |
10 |
KEY |
BOOT and RESET buttons |
11 |
TF & SIM |
TF card and Nano SIM slots |
12 |
Audio out |
Analog audio output |
13 |
4G |
4G module antenna |
14 |
Wi-Fi |
Wi-Fi module antenna |
15 |
LED |
Status indicators |
2.2 Power Supply
24 VDC nominal, wide input 9–36 VDC, with reverse-polarity and over-current protection.
2.3 Logging In
The FCU3101 can be accessed either through the debug serial port or over the network.
2.3.1 SSH Login
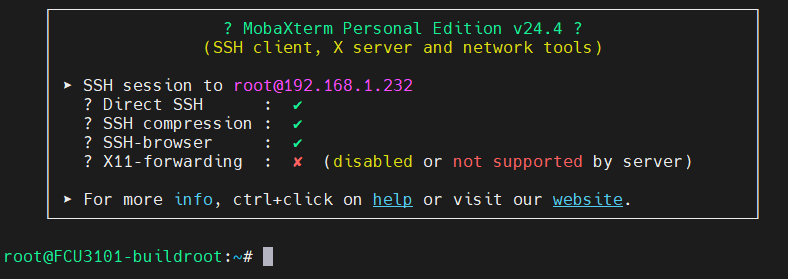
At boot, ETH0 defaults to 192.168.0.232 and ETH1 to 192.168.1.232. Use ETH1 for SSH login. Set your PC to an address on the 192.168.1.x subnet, power up the device, log in over SSH, and run commands to test basic functions and applications.
Default user name: root — no password.
Open a terminal program (MobaXterm is used here), configure the session as shown, and click Open:
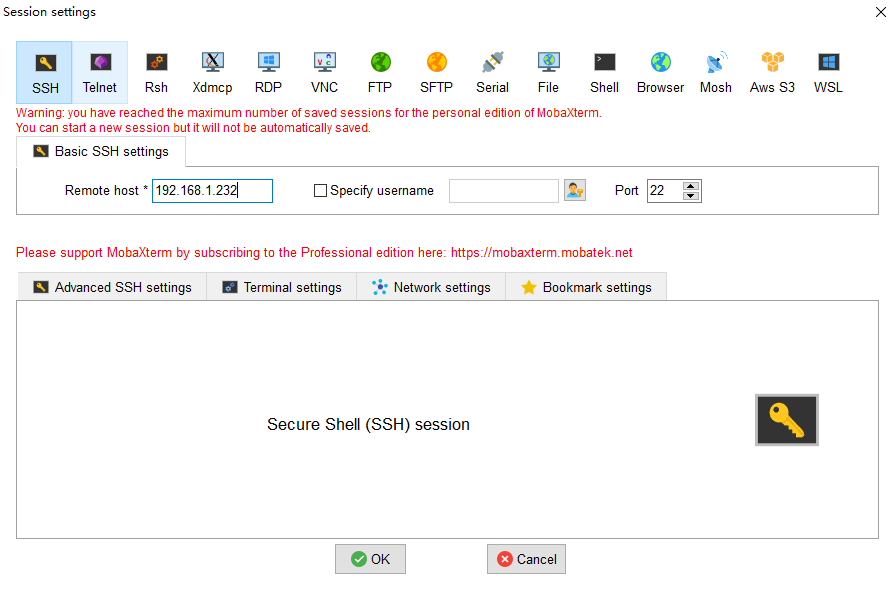
Click OK. When prompted, enter the user name root and leave the password empty.
2.3.2 Serial Console Login
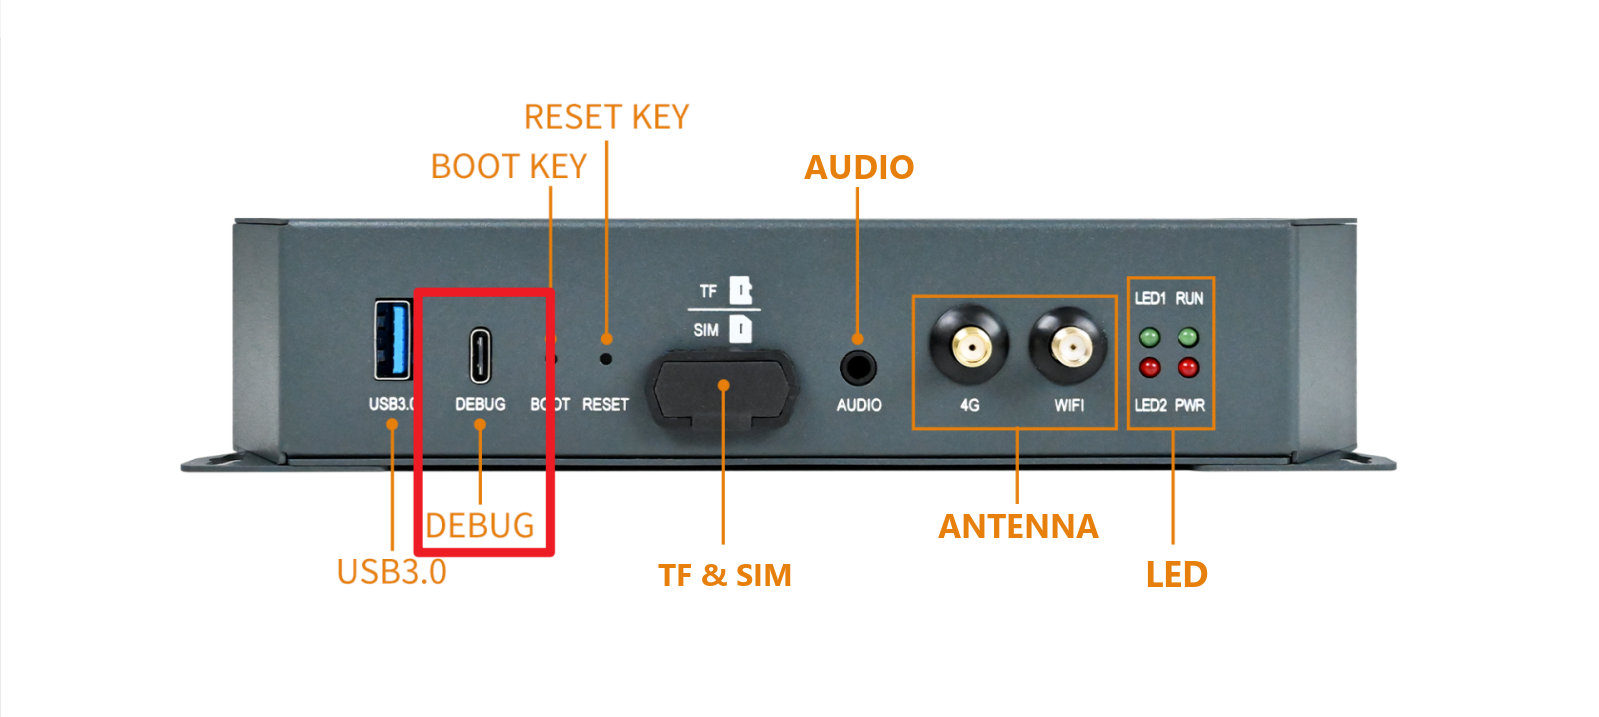
For the early development phase of the device, serial console access is available via a USB Type-C cable. For on-site commissioning and subsequent maintenance operations, network-based login is recommended. The serial console and SSH services share the same set of authentication credentials.
The DEBUG port is located as shown below:
2.3.3 Viewing System Logs
After the system boots, use dmesg to review kernel boot messages:
root@FCU3101-buildroot:/# dmesg | less
[   10.527223] Booting Linux on physical CPU 0xf00
……
root@FCU3101-buildroot:/# resize     # Fit the display to the terminal window
2.3.4 Memory and Storage Layout
Storage usage on the 2 GB + 16 GB configuration:
root@FCU3101-buildroot:~# df -h
Filesystem      Size  Used Avail Use% Mounted on
/dev/root        13G  1.2G   11G  10% /
devtmpfs        959M     0  959M   0% /dev
tmpfs           987M     0  987M   0% /dev/shm
tmpfs           395M  1.4M  394M   1% /run
tmpfs           987M  4.0K  987M   1% /tmp
/dev/mmcblk0p7  1.9G  105M  1.7G   6% /userdata  # Read/write partition for user data
Memory usage on the 2 GB + 16 GB configuration:
root@FCU3101-buildroot:~# free -hm
               total        used        free      shared  buff/cache   available
Mem:           1.9Gi       194Mi       1.6Gi        13Mi       146Mi       1.7Gi
Swap:             0B          0B          0B
Storage usage on the 4 GB + 64 GB configuration:
root@FCU3101-buildroot:~# df -h
Filesystem      Size  Used Avail Use% Mounted on
/dev/root        56G  1.2G   52G   3% /
devtmpfs        1.9G     0  1.9G   0% /dev
tmpfs           2.0G   20K  2.0G   1% /dev/shm
tmpfs           789M  1.4M  787M   1% /run
tmpfs           2.0G  4.0K  2.0G   1% /tmp
/dev/mmcblk0p7  1.9G  105M  1.7G   6% /userdata  # Read/write partition for user data
Memory usage on the 4 GB + 64 GB configuration:
root@FCU3101-buildroot:~# free -hm
               total        used        free      shared  buff/cache   available
Mem:           3.8Gi       200Mi       3.5Gi        13Mi       163Mi       3.6Gi
Swap:             0B          0B          0B
2.4 Programmable LED Strip
2.4.1 Changing the Lighting Effect
During boot, the LED strip is fixed to blue in U-Boot and cannot be changed. Once the file system starts, the strip is driven by the fltest-rgb.service service, which shows a blue chase effect by default.
To use a different effect:
Stop the service:
root@FCU3101-buildroot:~# systemctl stop fltest-rgb.service # Stop the service
Use the
fltest_RGButility to test and select the effect you want. See section 2.4.2 for usage.Write the tested command into the service file, replacing the existing start command:
Open
/etc/systemd/system/fltest-rgb.serviceand edit theExecStartline:root@FCU3101-buildroot:~# vi /etc/systemd/system/fltest-rgb.service
[Unit]
Description=LED Strip Early Boot Indicator
DefaultDependencies=no
After=local-fs.target
Before=sysinit.target
ConditionPathExists=/dev/spidev0.0

[Service]
Type=simple
ExecStart= fltest_RGB -m rainbow -s 20 -b 0.5    # Replace the lighting effect here
Restart=always
RestartSec=5s
StandardOutput=null
StandardError=null
KillMode=process

[Install]
WantedBy=sysinit.target
After a reboot, the new effect takes over automatically through the service.
2.4.2 Using the fltest_RGB Utility
fltest_RGB supports five display modes out of the box; run it with the corresponding arguments to switch effects. If none of the built-in modes fits, modify or extend the effect logic in the source and rebuild to create a custom effect.
Source path: Software Package\2. Images and Toolchain\Test Programs\fltest_RGB.c
The five default modes are listed below, followed by an example of changing the breathing-light color:
root@FCU3101-buildroot:~# fltest_RGB -h
Usage: fltest_RGB [options]
Options:
  -m, --mode <rainbow|rainbow_uniform|breath|static|chase>  Color mode
  -c, --color <RRGGBB>                Static color (HEX)
  -s, --speed <value>                 Transition speed (rainbow: degrees/s; chase: LEDs/s; 5–15 recommended)
  -b, --bright <0.0-1.0>              Maximum brightness
  -B, --breath <ms>                   Breathing period
Mode |
Effect |
Color / speed / brightness |
|---|---|---|
|
Rainbow |
Color fixed; speed and brightness adjustable |
|
Uniform rainbow |
Color fixed; speed and brightness adjustable |
|
Breathing |
Color, speed, and brightness adjustable |
|
Static |
Color, speed, and brightness adjustable |
|
Chase |
Color, speed, and brightness adjustable |
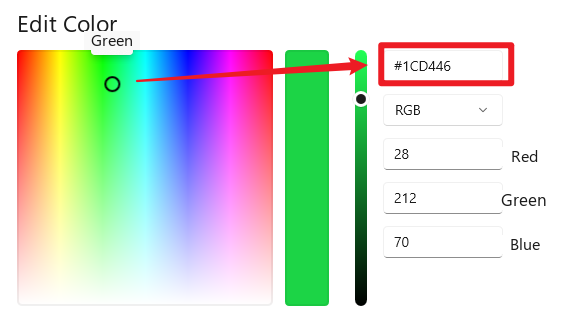
Changing the color in breath mode: the default service uses blue (0000FF). Use a color picker to sample the target color’s RGB value and pass it directly to the utility.
Some common colors for testing:
Color |
Name |
Hex RGB |
|---|---|---|
Red |
FF0000 |
|
Green |
00FF00 |
|
Blue |
0000FF |
Test commands:
root@FCU3101-buildroot:~# fltest_RGB -m breath -c FF0000  # Red breathing light
root@FCU3101-buildroot:~# fltest_RGB -m breath -c 00FF00  # Green breathing light
root@FCU3101-buildroot:~# fltest_RGB -m breath -c 0000FF  # Blue breathing light
2.5 Checking the Image Version
To view the device version information (2 GB + 16 GB configuration shown):
root@FCU3101-buildroot:~# board-info.sh
System and configuration information:

System:        GNU/Linux
SoC:           RV1126BJ
Distribution:  Linuxfs
Kernel:        6.1.141
Hostname:      FCU3101-buildroot
Current time:  Wed Jan 24 23:27:49 UTC 2024
Uptime:        41 min
Load average:  0.04, 0.09, 0.03
TF card:       No TF card
4G module:     EC20/25

-------------------------------------------------

CPU information:

Physical CPUs: 0
Logical CPUs:  4
Architecture:  aarch64

-------------------------------------------------

Memory information:

               total        used        free      shared  buff/cache   available
Mem:            1973         198        1533          13         242        1737
Swap:              0           0           0

-------------------------------------------------

IP information:

IP addresses:
          eth0: 192.168.0.232
          eth1: 192.168.1.232
          wlan0:
          wwan0: No 4G module

MAC addresses:
          eth0: 5e:12:99:27:59:40
          eth1: 00:e0:9a:08:da:f8
          wlan0: 84:fc:14:49:1d:84
          wwan0: No 4G module

Gateways: 192.168.1.1
          192.168.0.1

Routing table:
Kernel IP routing table
Destination     Gateway         Genmask         Flags Metric Ref    Use Iface
0.0.0.0         192.168.1.1     0.0.0.0         UG    0      0        0 eth1
0.0.0.0         192.168.0.1     0.0.0.0         UG    0      0        0 eth0
192.168.0.0     0.0.0.0         255.255.255.0   U     0      0        0 eth0
192.168.1.0     0.0.0.0         255.255.255.0   U     0      0        0 eth1

DNS information:
nameserver 114.114.114.114
nameserver 223.5.5.5
nameserver 114.114.114.114
nameserver 114.114.114.114
nameserver fda2:e684:2119::1
nameserver fd5d:4c21:e8f4::1
search .
-------------------------------------------------

Disk information:

Disk /dev/mmcblk0: 30777344 sectors
Disk /dev/mmcblk0boot0: 4 MB
Disk /dev/mmcblk0boot0 doesn't contain a valid partition table
...
2.6 CPU Frequency Scaling
2.6.1 Governors Available in the Kernel
root@FCU3101-buildroot:/# cat /sys/devices/system/cpu/cpu0/cpufreq/scaling_available_governors
interactive conservative ondemand userspace powersave performance schedutil
userspace means the frequency is set by a user-space program.
2.6.2 Supported Frequency Steps
root@FCU3101-buildroot:/# cat /sys/devices/system/cpu/cpu0/cpufreq/scaling_available_frequencies
594000 816000 1008000 1200000 1296000
2.6.3 Setting Userspace Mode and a 1200000 Frequency
root@FCU3101-buildroot:/# echo userspace > /sys/devices/system/cpu/cpu0/cpufreq/scaling_governor
root@FCU3101-buildroot:/# echo 1200000 > /sys/devices/system/cpu/cpu0/cpufreq/scaling_setspeed
2.6.4 Reading the Current Frequency
root@FCU3101-buildroot:/# cat /sys/devices/system/cpu/cpu0/cpufreq/cpuinfo_cur_freq
1200000
2.7 Reading the Temperature
root@FCU3101-buildroot:/# cat /sys/class/thermal/thermal_zone0/temp
39851
The value corresponds to 39.9 °C.
2.8 Watchdog
The watchdog is a common feature in embedded systems. On the OK1126B-S / OK1126BJ-S the watchdog device node is /dev/watchdog.
Start the watchdog with a 10-second reset timeout and keep feeding it; the system will not restart:
root@FCU3101-buildroot:/# fltest_watchdog
Watchdog Ticking Away!
If you stop the test program with Ctrl+C, feeding stops but the watchdog remains open, so the system resets after 10 seconds.
To avoid the reset, disable the watchdog within 10 seconds of exiting the program:
root@FCU3101-buildroot:/# fltest_watchdog -d
Watchdog disabled.
Start the watchdog with a 10-second timeout but never feed it; the system restarts after 10 seconds:
root@FCU3101-buildroot:/# fltest_watchdog -e
Watchdog Ticking Away!
[   39.114587] watchdog: watchdog0: watchdog did not stop!
2.9 RTC
Note: Make sure the coin cell is installed on the board and that its voltage is normal.
The RTC test uses date and hwclock to set the software and hardware clocks, then verifies that the software clock reads the RTC correctly after the board is powered off and on again.
Set the time:
root@FCU3101-buildroot:/# date -s "2025-12-12 17:23:00"   # Set the system time
Mon Dec 12 17:23:00 UTC 2025
root@FCU3101-buildroot:/# hwclock -w     # Write the system time to the RTC
root@FCU3101-buildroot:/# hwclock -r     # Read the RTC time
Mon Dec 12 17:24:10 2025  0.000000 seconds
Power the board off and on again, then read the system time — it will have been synchronized:
root@FCU3101-buildroot:/# date
Mon Dec 12 17:24:39 UTC 2025
2.10 System LEDs
The FCU3101 has four system LEDs: power (PWR), system running (RUN), and two user-definable LEDs (LED1 and LED2).
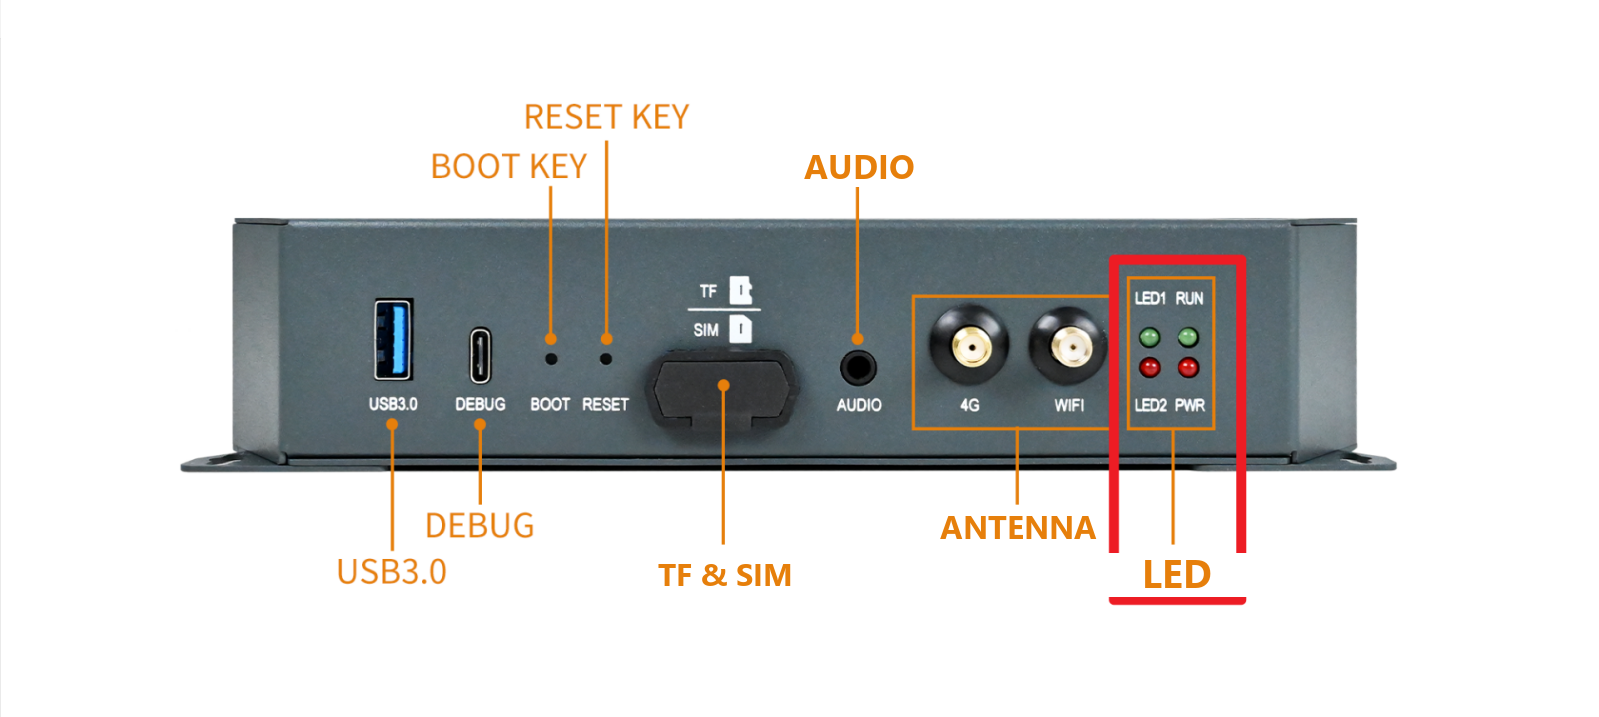
PWR indicates system power: it lights up automatically at power-on and goes out at power-off.
RUN has two behaviors:
Flashing mode: RUN stays on during flashing and blinks once per second when flashing completes;
Boot mode: RUN stays off during boot; once boot completes, RUN acts as a heartbeat LED.
LED1 and LED2 can be assigned any function you need.
The mapping between software and hardware is listed below:
Device node |
Silkscreen |
User-definable |
|---|---|---|
|
RUN |
Yes |
|
LED1 |
Yes |
|
LED2 |
Yes |
Taking LED1 as an example:
root@FCU3101-buildroot:/# echo 1 > /sys/class/leds/LED1/brightness  # On
root@FCU3101-buildroot:/# echo 0 > /sys/class/leds/LED1/brightness  # Off
2.11 RESET Button
2.11.1 Restoring Network Parameters
The RESET button restores network parameters with a single press:
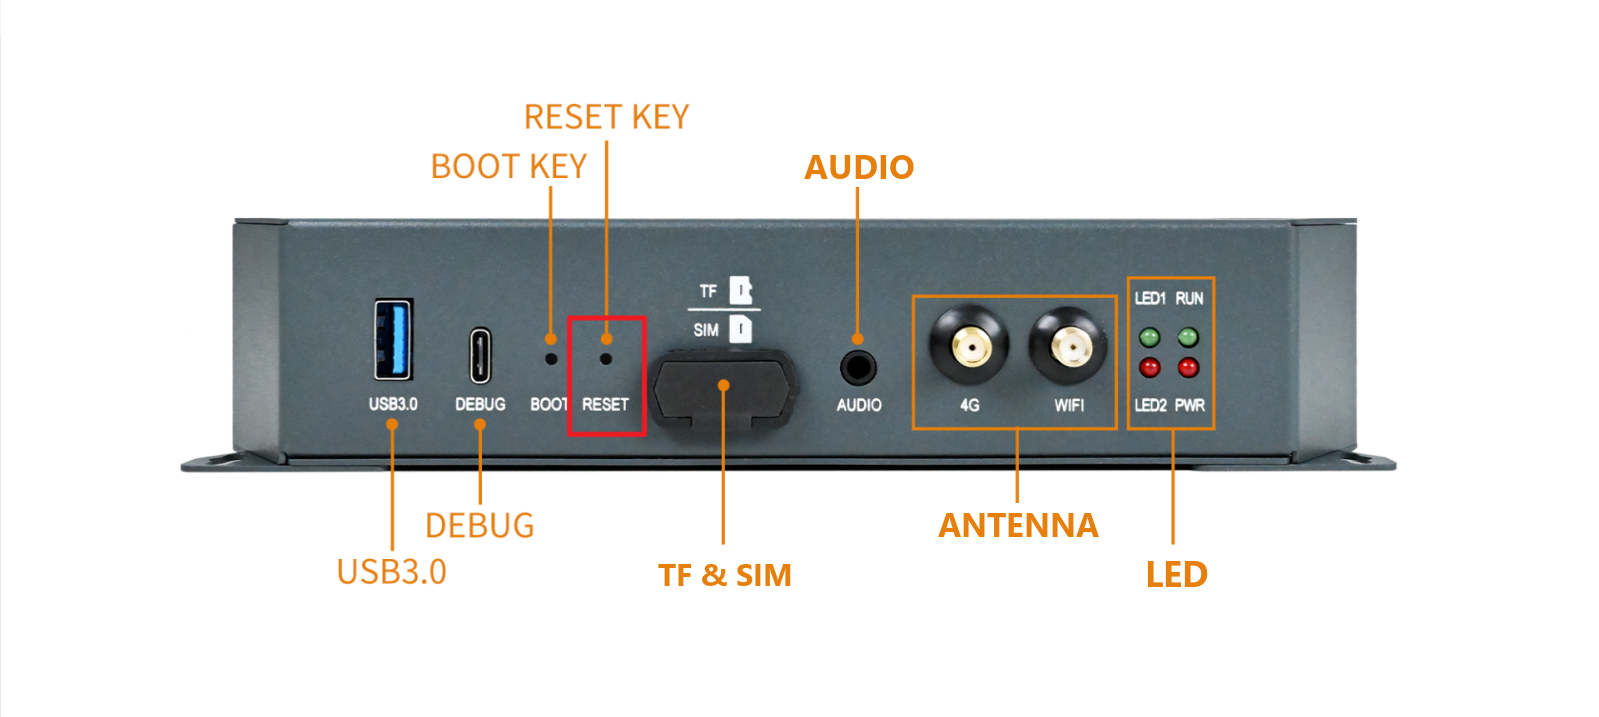
The button triggers a reset of the network node’s connection parameters. With evtest you can inspect every event type — key presses, mouse movement, touchscreen events — all captured and reported precisely. You can also trigger custom events from your own application.
Usage: evtest /dev/input/eventX (the event node to monitor)
root@FCU3101-buildroot:/# ls /dev/input/event*   # List all event nodes
/dev/input/event0
/dev/input/event1
/dev/input/event2         # RESET button
root@FCU3101-buildroot:/# evtest /dev/input/event2     # evtest + event node to monitor
Monitoring the RESET button with evtest:
root@FCU3101-buildroot:/# evtest /dev/input/event2
Input driver version is 1.0.1
Input device ID: bus 0x19 vendor 0x1 product 0x1 version 0x100
Input device name: "adc-keys"
Supported events:
  Event type 0 (EV_SYN)
  Event type 1 (EV_KEY)
    Event code 114 (KEY_VOLUMEDOWN)
Properties:
Testing ... (interrupt to exit)
Event: time 1706141038.137394, type 1 (EV_KEY), code 114 (KEY_VOLUMEDOWN), value 1
Event: time 1706141038.137394, -------------- SYN_REPORT ------------
Event: time 1706141038.241476, type 1 (EV_KEY), code 114 (KEY_VOLUMEDOWN), value 0
Event: time 1706141038.241476, -------------- SYN_REPORT ------------
evtest is part of the file system and can be run from any directory:
root@FCU3101-buildroot:/# find -name evtest
./usr/bin/evtest             # Location of the utility
2.11.2 Disabling the Network Reset Function
The one-press network restore is implemented by a daemon that starts automatically. To disable the feature, stop the daemon:
root@FCU3101-buildroot:/# cat /etc/init.d/S90autorun.sh    # View the startup script
#!/bin/bash
if [ $1 != "start" ];then exit;fi
if [ -e /etc/gen_partiton_dev.sh ];then /etc/gen_partiton_dev.sh;fi

/etc/init.d/instant_recovery.sh &         # Starts the button daemon in the background
/etc/forlinx.sh &
root@FCU3101-buildroot:/# vi /etc/init.d/S90autorun.sh    # Edit the startup script
#!/bin/bash
if [ $1 != "start" ];then exit;fi
if [ -e /etc/gen_partiton_dev.sh ];then /etc/gen_partiton_dev.sh;fi

#/etc/init.d/instant_recovery.sh &       # Comment out to disable the daemon; takes effect after reboot
/etc/forlinx.sh &
Note: the IP address restored by this function is temporary — after a reboot the device returns to its configured static IP. To change the default IP permanently, see section 2.23, Static IP Configuration.
2.12 UART
2.12.1 Interface
The serial wiring is shown in the highlighted area:
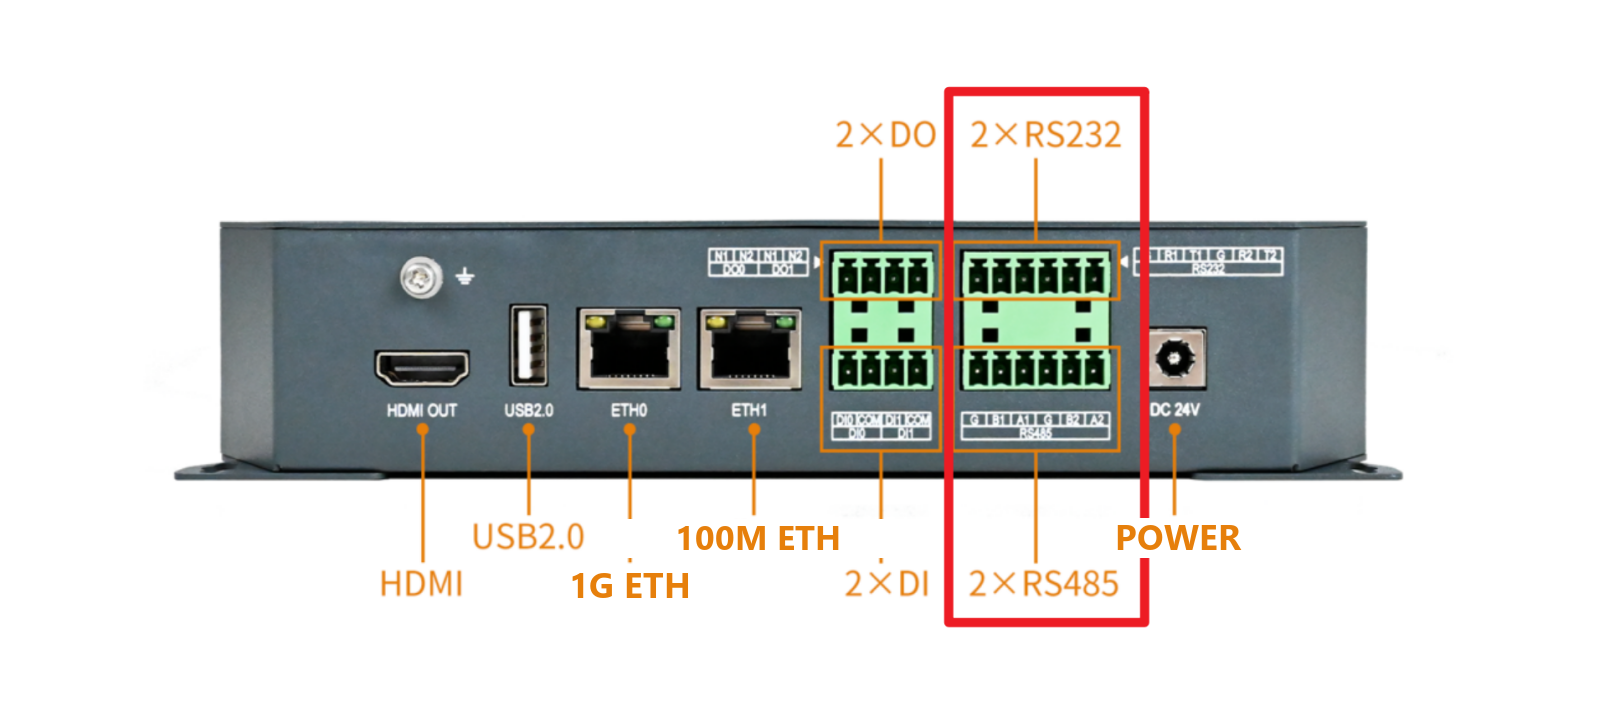
2.12.2 Device Mapping
Device node |
Silkscreen |
|---|---|
|
RS232_1 |
|
RS232_2 |
|
RS485_1 |
|
RS485_2 |
2.12.3 Testing RS-485
The test below uses a PC as the counterpart; if you have a dedicated RS-485 device you can connect it directly. RS485_2 is used here — to test another port, simply change the device node.
Connect an RS-232-to-RS-485 converter to the FCU3101’s RS485_2 port.
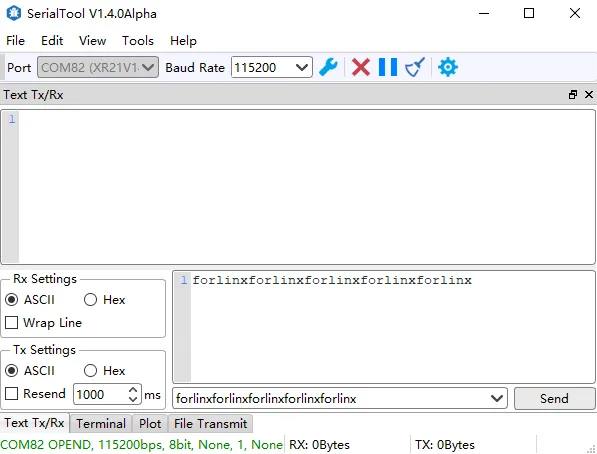
RS485_2 sends a randomly generated character stream to the PC at 115200 bps, while you send “Forlinx ok” from a serial terminal on the PC. The console output looks like this:
root@FCU3101-buildroot:~# fltest_uarttest -d /dev/ttyS5 -b 115200 -r &
[1] 1631
root@FCU3101-buildroot:~# rx_0: forlinxforlinxforlinxforlinxforl
The serial terminal on the PC shows the data sent and received:
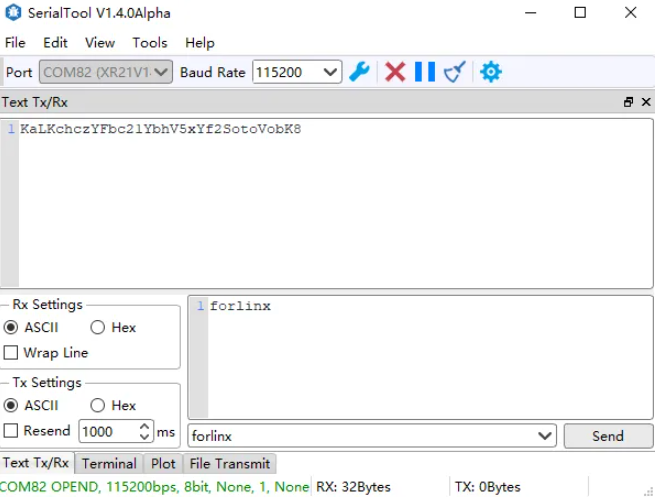
To test transmission from the FCU3101:
root@FCU3101-buildroot:~# fltest_uarttest -d /dev/ttyS5 -b 115200 -w
[ 4750.838266] of_dma_request_slave_channel: dma-names property of node '/serial@ff0c0000' missing or empty
[ 4750.838403] dw-apb-uart ff0c0000.serial: failed to request DMA, use interrupt mode
tx_0: KaLKchczYFbc21YbhV5xYf2SotoVobK8
The PC receives the data:
2.13 Ethernet
The FCU3101 provides two RJ45 Ethernet ports: eth0 is gigabit and eth1 is 100 Mbps.
2.13.1 Device Mapping
Node |
Silkscreen |
Factory IP |
|---|---|---|
|
ETH0 |
192.168.0.232 |
|
ETH1 |
192.168.1.232 |
2.13.2 Testing the NIC
Connect the PC to an FCU3101 Ethernet port and assign the PC a static IP. ETH1 is 192.168.1.232, and networking is enabled by default at boot.
Note: if you change ETH1’s network configuration and do not assign it a default IP, the port may occasionally come up in the unknown state at boot. This does not affect network operation.
Run ping 192.168.1.232 from a Windows command prompt:
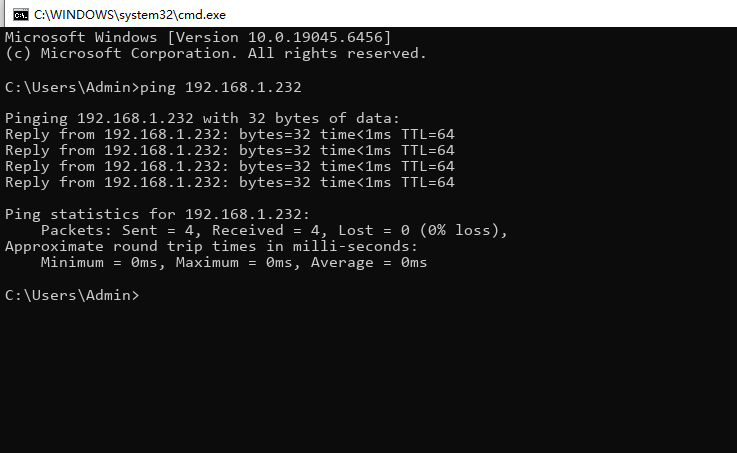
If the PC can ping the FCU3101 and an SSH login succeeds, the NIC is working.
2.13.3 Basic IPv4 Commands
These examples were run on Forlinx’s own network. Your network will differ — configure the device to match your environment.
The FCU3101 has two NICs: eth0 (default IP 192.168.0.232) and eth1 (default IP 192.168.1.232).
Displaying and configuring interfaces
ifconfig displays or configures network devices, and ethtool queries or sets NIC parameters.
root@FCU3101-buildroot:/# ifconfig
Output:
eth0      Link encap:Ethernet  HWaddr C2:EE:E4:C2:E7:15
          UP BROADCAST MULTICAST  MTU:1500  Metric:1
          RX packets:0 errors:0 dropped:0 overruns:0 frame:0
          TX packets:0 errors:0 dropped:0 overruns:0 carrier:0
          collisions:0 txqueuelen:1000
          RX bytes:0 (0.0 B)  TX bytes:0 (0.0 B)
          Interrupt:80

eth1      Link encap:Ethernet  HWaddr 00:E0:99:EB:2B:A0
          inet addr:192.168.1.232  Bcast:192.168.1.255  Mask:255.255.255.0
          inet6 addr: fe80::2e0:99ff:feeb:2ba0/64 Scope:Link
          UP BROADCAST RUNNING MULTICAST  MTU:1500  Metric:1
          RX packets:5 errors:0 dropped:3 overruns:0 frame:0
          TX packets:17 errors:0 dropped:0 overruns:0 carrier:0
          collisions:0 txqueuelen:1000
          RX bytes:1095 (1.0 KiB)  TX bytes:1248 (1.2 KiB)

lo        Link encap:Local Loopback
          inet addr:127.0.0.1  Mask:255.0.0.0
          inet6 addr: ::1/128 Scope:Host
          UP LOOPBACK RUNNING  MTU:65536  Metric:1
          RX packets:2 errors:0 dropped:0 overruns:0 frame:0
          TX packets:2 errors:0 dropped:0 overruns:0 carrier:0
          collisions:0 txqueuelen:1000
          RX bytes:184 (184.0 B)  TX bytes:184 (184.0 B)
Setting an IP address— set
eth0to 192.168.1.120:
root@FCU3101-buildroot:/# ifconfig eth0 192.168.1.120     # Set the IP
root@FCU3101-buildroot:/# ifconfig eth0                   # Check the result
Output:
eth0      Link encap:Ethernet  HWaddr C2:EE:E4:C2:E7:15
          inet addr:192.168.1.120  Bcast:192.168.1.255  Mask:255.255.255.0
          UP BROADCAST MULTICAST  MTU:1500  Metric:1
          RX packets:0 errors:0 dropped:0 overruns:0 frame:0
          TX packets:0 errors:0 dropped:0 overruns:0 carrier:0
          collisions:0 txqueuelen:1000
          RX bytes:0 (0.0 B)  TX bytes:0 (0.0 B)
          Interrupt:80
inet addr:192.168.1.120 confirms the change.
Setting DNS
root@FCU3101-buildroot:/# echo nameserver 8.8.8.8 >> /etc/resolv.conf          # Google DNS
root@FCU3101-buildroot:/# echo nameserver 114.114.114.114 >> /etc/resolv.conf  # DNS in China
Obtaining an IP address over DHCP
If the control unit is connected to a router with DHCP enabled, run:
root@FCU3101-buildroot:/# udhcpc -i eth0
-i specifies the interface name; on Forlinx control units the wired NIC is eth0. DNS server entries are added to /etc/resolv.conf automatically.
Changing the MAC address
The following change is temporary and lasts only for the current session.
root@FCU3101-buildroot:/# ifconfig eth0 down
root@FCU3101-buildroot:/# ifconfig eth0 hw ether 08:90:90:90:90:90   # Set eth0 MAC to 08:90:90:90:90:90
root@FCU3101-buildroot:/# ifconfig eth0
eth0      Link encap:Ethernet  HWaddr 08:90:90:90:90:90
          inet addr:192.168.1.120  Bcast:192.168.1.255  Mask:255.255.255.0
          BROADCAST MULTICAST  MTU:1500  Metric:1
          RX packets:0 errors:0 dropped:0 overruns:0 frame:0
          TX packets:0 errors:0 dropped:0 overruns:0 carrier:0
          collisions:0 txqueuelen:1000
          RX bytes:0 (0.0 B)  TX bytes:0 (0.0 B)
          Interrupt:80
HWaddr 08:90:90:90:90:90 confirms the change.
Setting the subnet mask
root@FCU3101-buildroot:/# ifconfig eth0 netmask 255.255.255.0   # Set the eth0 mask to 255.255.255.0
root@FCU3101-buildroot:/# ifconfig eth0
Output:
eth0      Link encap:Ethernet  HWaddr 08:90:90:90:90:90
          inet addr:192.168.1.120  Bcast:192.168.1.255  Mask:255.255.255.0
          inet6 addr: fe80::64cd:22ff:fe3c:e6a2/64 Scope:Link
          UP BROADCAST RUNNING MULTICAST  MTU:1500  Metric:1
          RX packets:867 errors:0 dropped:0 overruns:0 frame:0
          TX packets:88 errors:0 dropped:0 overruns:0 carrier:0
          collisions:0 txqueuelen:1000
          RX bytes:87053 (85.0 KiB)  TX bytes:27156 (26.5 KiB)
Setting the broadcast address
root@FCU3101-buildroot:/# ifconfig eth0 broadcast 192.168.1.255   # Set the eth0 broadcast address
root@FCU3101-buildroot:/# ifconfig eth0
Output:
eth0      Link encap:Ethernet  HWaddr 08:90:90:90:90:90
          inet addr:192.168.1.120  Bcast:192.168.1.255  Mask:255.255.255.0
          BROADCAST MULTICAST  MTU:1500  Metric:1
          RX packets:0 errors:0 dropped:0 overruns:0 frame:0
          TX packets:0 errors:0 dropped:0 overruns:0 carrier:0
          collisions:0 txqueuelen:1000
          RX bytes:0 (0.0 B)  TX bytes:0 (0.0 B)
          Interrupt:80
Bcast:192.168.1.255 confirms the change.
Adding or removing the default gateway
root@FCU3101-buildroot:/# route add default gw 192.168.1.1 eth0      # Add the eth0 default gateway
root@FCU3101-buildroot:/# route del default gw 192.168.1.1 eth0      # Remove it
Bringing the interface down and up
root@FCU3101-buildroot:/# ifconfig eth0 down      # Disable eth0
root@FCU3101-buildroot:/# ifconfig eth0 up        # Enable eth0
2.13.4 Nginx Web Server
The FCU3101 includes an Nginx web server. Nginx is an efficient multi-tasking HTTP server for Linux and is well suited to embedded systems.
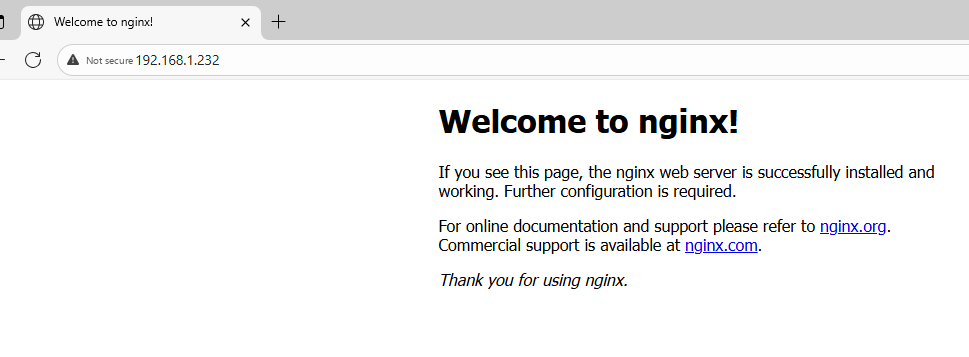
Nginx starts automatically at boot. Enter the FCU3101’s IP address in a browser to view the pages served from the control unit. The screenshot below shows the page in Microsoft Edge:
2.13.5 Reverse Proxy
Building on the Nginx web service, the FCU3101 supports reverse proxying. A reverse proxy is a core component of modern architectures: it hides backend details, simplifies system design, and improves reliability. Configuration:
root@FCU3101-buildroot:/# ls /etc/nginx/nginx.conf    # Nginx configuration file
/etc/nginx/nginx.conf
root@FCU3101-buildroot:/# vi /etc/nginx/nginx.conf    # Edit the file
worker_processes  1;
events {
    worker_connections  1024;
}
http {
    include       mime.types;
    default_type  application/octet-stream;
    sendfile        on;
    keepalive_timeout  65;
    server {
        listen       80;
        server_name  localhost;
        # Static content
        location / {
            root   html;
            index  index.html index.htm;
        }
        # Reverse proxy to the backend API service
        location /api/ {
          proxy_pass         http://127.0.0.1:3000;   # Forwarding target
          proxy_set_header   Host $host;              # Pass the original host
          proxy_set_header   X-Real-IP $remote_addr;  # Pass the client's real IP
          proxy_set_header   X-Forwarded-For $proxy_add_x_forwarded_for;  # Pass the proxy chain
          proxy_http_version 1.1;                    # Enable HTTP/1.1 (keep-alive)
          proxy_set_header   Upgrade $http_upgrade;  # WebSocket upgrade header
          proxy_set_header   Connection "upgrade";   # Keep the connection in upgrade state
        }
        # Error pages
        error_page   500 502 503 504  /50x.html;
        location = /50x.html {
            root   html;
        }
    }
}
With this configuration and the backend service running, browsing to http://192.168.1.232/api/test or http://localhost/api/test forwards the request to http://127.0.0.1:3000/test and returns the backend response.
2.13.6 FTP Server
vsftpd (version 3.0.5) starts automatically at boot.
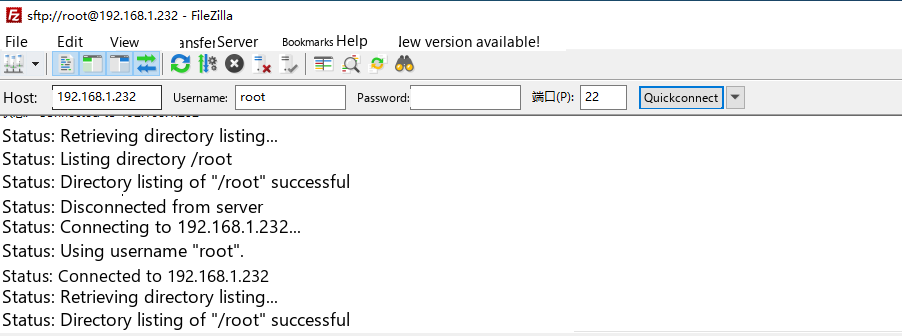
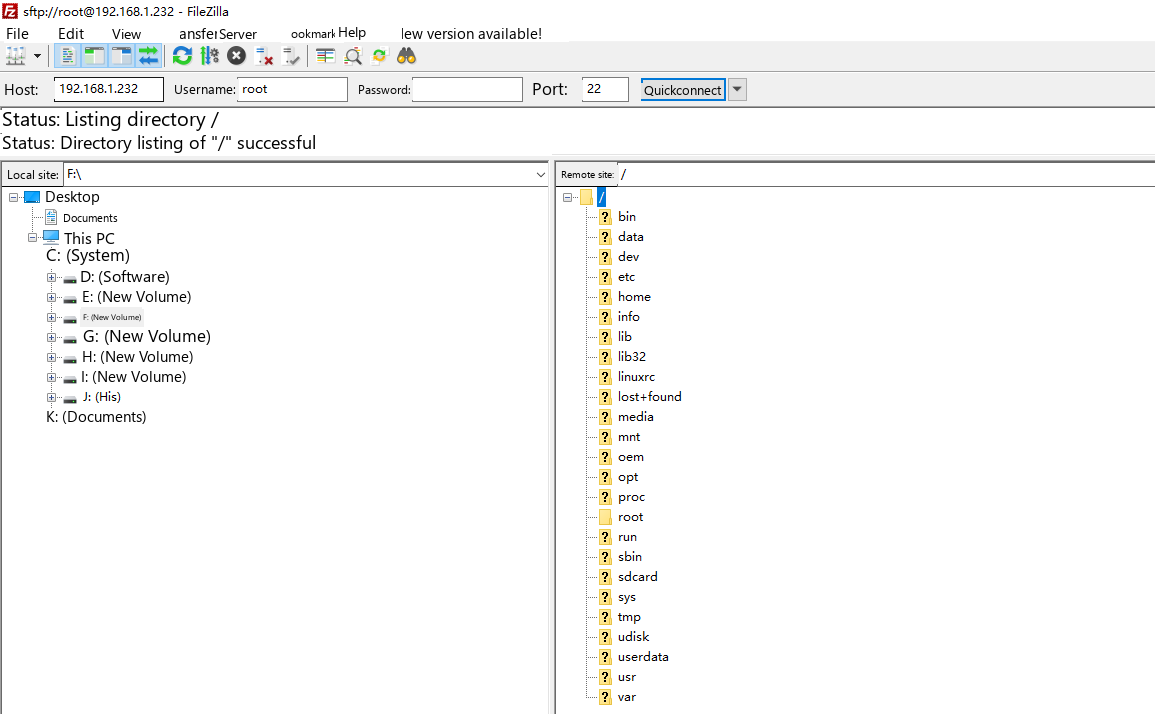
Connect from a PC with FileZilla, entering the FTP credentials in the highlighted fields (the root account has no password by default). ETH1 is used by default:
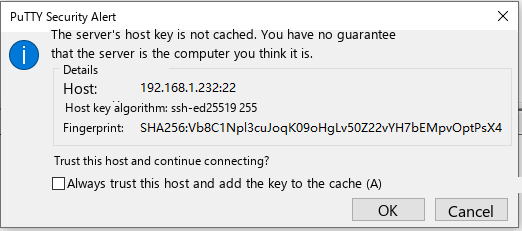
Click OK in the intermediate dialog:
The FCU3101 directory tree is then available:
2.14 Wi-Fi
The Wi-Fi module is enabled and its driver loaded at boot. It shares the 4G module’s antenna.
2.14.1 STA Mode
2.14.1.1 Checking Whether the Driver Is Loaded
root@FCU3101-buildroot:/# lsmod
Module                  Size  Used by
8723du               1474560  0
If 8723du appears, the module is loaded. If it does not, the module is not loaded — check that the kernel and file-system module versions match.
2.14.1.2 Loading the Module
If lsmod does not list 8723du, load it manually:
root@FCU3101-buildroot:/# insmod /lib/modules/$(uname -r)/kernel/drivers/net/wireless/realtek/rtl8723DU/8723du.ko /* Load 8723du */
2.14.1.3 Configuring Wi-Fi
Note: this section uses the fltest_wifi.sh script for a quick functional check. The script shuts down all other network connections — keep this in mind if you are connected over SSH.
Arguments: -s is the hotspot SSID, -p is the password (use -p NONE for an open network). The router uses WPA encryption.
Connection output:
root@FCU3101-buildroot:/# fltest_wifi.sh -i wlan0 -s forlinx-wlan -p fl03123102650
killall: dnsmasq: no process killed
wifi wlan0
ssid forlinx-wlan
pasw fl03123102650
waiting...
try to connect again...
udhcpc: started, v1.36.1
udhcpc: broadcasting discover
udhcpc: broadcasting select for 10.10.20.59, server 10.10.23.254
udhcpc: lease of 10.10.20.59 obtained from 10.10.23.254, lease time 1800
deleting routers
adding dns 119.29.29.29
adding dns 114.114.114.114
Finshed!
2.14.1.4 Testing Wi-Fi
Ping a domain name or IP address:
root@FCU3101-buildroot:/# ping www.baidu.com -I wlan0 –c 5
PING www.a.shifen.com (220.181.111.1) from 10.10.20.59 wlan0: 56(84) bytes of data.
64 bytes from 220.181.111.1: icmp_seq=1 ttl=52 time=32.1 ms
64 bytes from 220.181.111.1: icmp_seq=2 ttl=52 time=14.9 ms
64 bytes from 220.181.111.1: icmp_seq=3 ttl=52 time=14.8 ms
64 bytes from 220.181.111.1: icmp_seq=4 ttl=52 time=14.9 ms
64 bytes from 220.181.111.1: icmp_seq=5 ttl=52 time=14.6 ms

--- www.a.shifen.com ping statistics ---
5 packets transmitted, 5 received, 0% packet loss, time 10548ms
rtt min/avg/max/mdev = 14.621/18.265/32.071/6.903 ms
Signal strength:
root@FCU3101-buildroot:/# cat /proc/net/wireless | grep wlan0 | awk '{print $3}'    # Signal strength
97.
root@FCU3101-buildroot:/# cat /proc/net/wireless | grep wlan0 | awk '{print $4}'    # Signal quality (dBm)
51.
root@FCU3101-buildroot:/# cat /proc/net/wireless | grep wlan0 | awk '{print $5}'    # Background noise (dBm)
0.
2.14.1.5 Unloading the Module
root@FCU3101-buildroot:/# rmmod 8723du
2.14.2 AP Mode
By default the Wi-Fi hotspot hands out addresses in the range 192.168.42.100–192.168.42.200 with gateway 192.168.42.1 and WPA-PSK encryption. To change the address range or gateway, edit /etc/dnsmasq.conf.
The hotspot name and password are set in /etc/hostapd-2.4g.conf — by default the SSID is FCU3101_WIFI_2.4G_AP and the password is 12345678:
root@FCU3101-buildroot:/# cat /etc/hostapd-2.4g.conf
interface=wlan0
driver=nl80211
channel=9
hw_mode=g

auth_algs=1
ieee80211n=1
ieee80211ac=1
wpa=2

ssid=FCU3101_WIFI_2.4G_AP                         # Hotspot name
wpa_passphrase=12345678                           # Hotspot password
wpa_key_mgmt=WPA-PSK
wpa_pairwise=CCMP
rsn_pairwise=CCMP
Before using the AP mode, make sure the Ethernet port has internet access; if it does not, check the Ethernet or router connection. If the web application is running, stop and restart it before running this test.
root@FCU3101-buildroot:/web/shell# ./stop.sh
Stop appwatching ...                                       [  OK  ]
Stop applogging ...                                        [  OK  ]
Stop ws_sshd ...                                           [  OK  ]
Stop webservice ...                                        [  OK  ]
root@FCU3101-buildroot:/web/shell# ./up.sh
Stop appwatching ...                                       [  OK  ]
Stop applogging ...                                        [  OK  ]
Stop ws_sshd ...                                           [  OK  ]
Stop webservice ...                                        [  OK  ]
Start appwatching ...                                      [  OK  ]
Then enable AP mode with fltest_hostap.sh:
root@FCU3101-buildroot:/# fltest_hostap.sh   # AP mode test
done!
root@FCU3101-buildroot:/# wlan0: interface state UNINITIALIZED->ENABLED
wlan0: AP-ENABLED
Mobile devices can now connect to the FCU3101’s hotspot and reach the internet through it.
2.15 Bluetooth
The Wi-Fi/BT module on the carrier board includes Bluetooth. This section shows how to transfer data between a phone and the FCU3101 over Bluetooth.
Note: connect the Wi-Fi antenna before pairing.
2.15.1 Configuration
root@FCU3101-buildroot:/# bluetoothctl
hci0 new_settings: powered bondable ssp br/edr le secure-conn
Agent registered
[CHG] Controller 88:49:2D:18:4B:99 Pairable: yes
[bluetooth]# power on
Changing power on succeeded
[bluetooth]# agent on
Agent is already registered
[bluetooth]# default-agent
Default agent request successful
[bluetooth]# discoverable on
hci0 new_settings: powered connectable bondable ssp br/edr le secure-conn
hci0 new_settings: powered connectable discoverable bondable ssp br/edr le secure-conn
Changing discoverable on succeeded
[CHG] Controller 88:49:2D:18:4B:99 Discoverable: yes
2.15.2 Passive Pairing
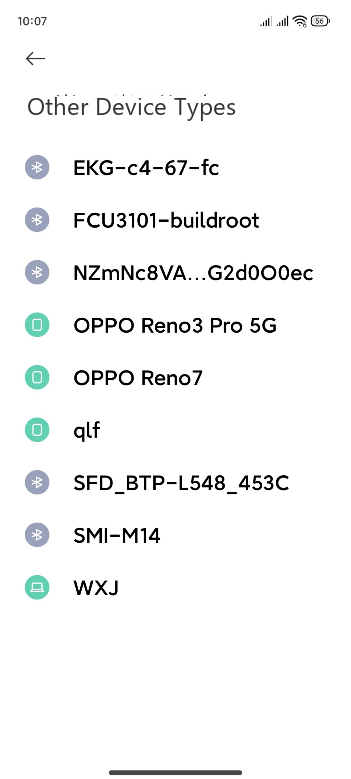
Open Bluetooth settings on the phone and scan; the device “FCU3101-buildroot” appears. Select it to pair.
The terminal prints the pairing request; enter yes:
hci0 FC:5B:8C:1A:A8:66 type BR/EDR connected eir_len 29
[NEW] Device FC:5B:8C:1A:A8:66 2526534850's Xiaomi 14
Request confirmation14]#
[agent] Confirm passkey 866438 (yes/no): yes
hci0 new_link_key FC:5B:8C:1A:A8:66 type 0x05 pin_len 0 store_hint 1
hci0 device_flags_changed: FC:5B:8C:1A:A8:66 (BR/EDR)
     supp: 0x00000001  curr: 0x00000000
[CHG] Device FC:5B:8C:1A:A8:66 INFO: 0x0007 (7)
[CHG] Device FC:5B:8C:1A:A8:66 Bonded: yes
[CHG] Device FC:5B:8C:1A:A8:66 Modalias: bluetooth:v038Fp1200d1436
[CHG] Device FC:5B:8C:1A:A8:66 UUIDs: 00001105-0000-1000-8000-00805f9b34fb
[CHG] Device FC:5B:8C:1A:A8:66 UUIDs: 0000110a-0000-1000-8000-00805f9b34fb
[CHG] Device FC:5B:8C:1A:A8:66 UUIDs: 0000110c-0000-1000-8000-00805f9b34fb
[CHG] Device FC:5B:8C:1A:A8:66 UUIDs: 00001112-0000-1000-8000-00805f9b34fb
[CHG] Device FC:5B:8C:1A:A8:66 UUIDs: 00001115-0000-1000-8000-00805f9b34fb
[CHG] Device FC:5B:8C:1A:A8:66 UUIDs: 00001116-0000-1000-8000-00805f9b34fb
[CHG] Device FC:5B:8C:1A:A8:66 UUIDs: 0000111f-0000-1000-8000-00805f9b34fb
[CHG] Device FC:5B:8C:1A:A8:66 UUIDs: 0000112f-0000-1000-8000-00805f9b34fb
[CHG] Device FC:5B:8C:1A:A8:66 UUIDs: 00001132-0000-1000-8000-00805f9b34fb
[CHG] Device FC:5B:8C:1A:A8:66 UUIDs: 00001200-0000-1000-8000-00805f9b34fb
[CHG] Device FC:5B:8C:1A:A8:66 UUIDs: 00001800-0000-1000-8000-00805f9b34fb
[CHG] Device FC:5B:8C:1A:A8:66 UUIDs: 00001801-0000-1000-8000-00805f9b34fb
[CHG] Device FC:5B:8C:1A:A8:66 UUIDs: 0000fcc0-0000-1000-8000-00805f9b34fb
[CHG] Device FC:5B:8C:1A:A8:66 UUIDs: 0000fcc0-36a2-11ea-8467-484d7e99a198
[CHG] Device FC:5B:8C:1A:A8:66 UUIDs: 0000fdaa-0000-1000-8000-00805f9b34fb
[CHG] Device FC:5B:8C:1A:A8:66 UUIDs: 98b97136-36a2-11ea-8467-484d7e99a198
[CHG] Device FC:5B:8C:1A:A8:66 UUIDs: ada499be-27d6-11ec-9427-0a80ff2603de
[CHG] Device FC:5B:8C:1A:A8:66 ServicesResolved: yes
[CHG] Device FC:5B:8C:1A:A8:66 INFO: 0x000f (15)
...
Listing and removing paired devices:
[bluetooth]# devices                        # List paired devices
Device FC:5B:8C:1A:A8:66 2526534850's Xiaomi 14
 [bluetooth]# remove FC:5B:8C:1A:A8:66      # Remove a device
[DEL] Device FC:5B:8C:1A:A8:66 2526534850's Xiaomi 14
Device has been removed
2.15.3 Active Pairing
Instead of waiting to be paired, you can initiate pairing from the terminal:
[bluetooth]# scan on    # Scan for discoverable devices
SetDiscoveryFilter success
hci0 type 7 discovering on
Discovery started
[CHG] Controller 88:49:2D:18:4B:99 Discovering: yes
[NEW] Device FC:5B:8C:1A:A8:66 2526534850's Xiaomi 14
[bluetooth]# scan off                   # Stop scanning
[bluetooth]# pair FC:5B:8C:1A:A8:66     # Pair
Attempting to pair with FC:5B:8C:1A:A8:66
hci0 device_flags_changed: FC:5B:8C:1A:A8:66 (BR/EDR)
     supp: 0x00000001  curr: 0x00000000
hci0 FC:5B:8C:1A:A8:66 type BR/EDR connected eir_len 24
[CHG] Device FC:5B:8C:1A:A8:66 INFO: 0x0002 (2)
[CHG] Device FC:5B:8C:1A:A8:66 Connected: yes
Request confirmation14]#
 [agent] Confirm passkey 316527 (yes/no): yes     # Confirm the passkey
2.15.4 Receiving Files
Once paired, send a file from the phone to the FCU3101 over Bluetooth.
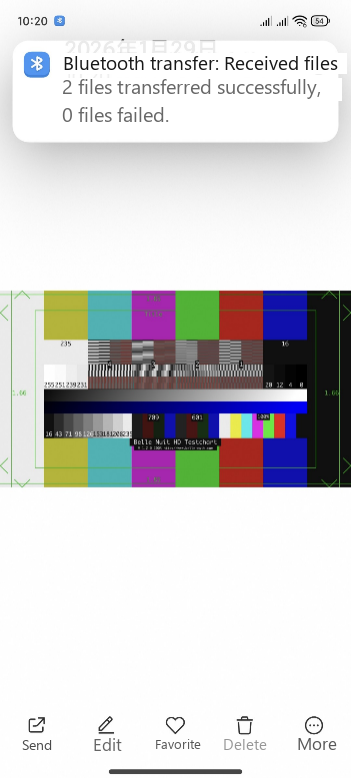
Received files are stored in /tmp.
2.15.5 Sending Files
To send a file to the phone:
root@FCU3101-buildroot:/# fltest_obexctl.sh          # Start obexctl
[NEW] Client /org/bluez/obex
[obex]# connect FC:5B:8C:1A:A8:66                    # Connect to the target device's MAC
Attempting to connect to 14:99:3E:03:1B:E4
Attempting to connect to FC:5B:8C:1A:A8:66
[NEW] Session /org/bluez/obex/client/session0 [default]
[NEW] ObjectPush /org/bluez/obex/client/session0
Connection successful
[FC:5B:8C:1A:A8:66]# send /userdata/belle-nuit-testchart-1080p.png    # Send the file
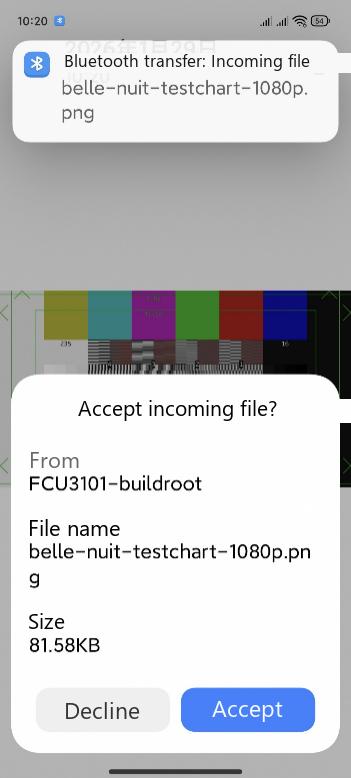
The phone receives an incoming-file request; accept it to start the transfer.
2.16 4G
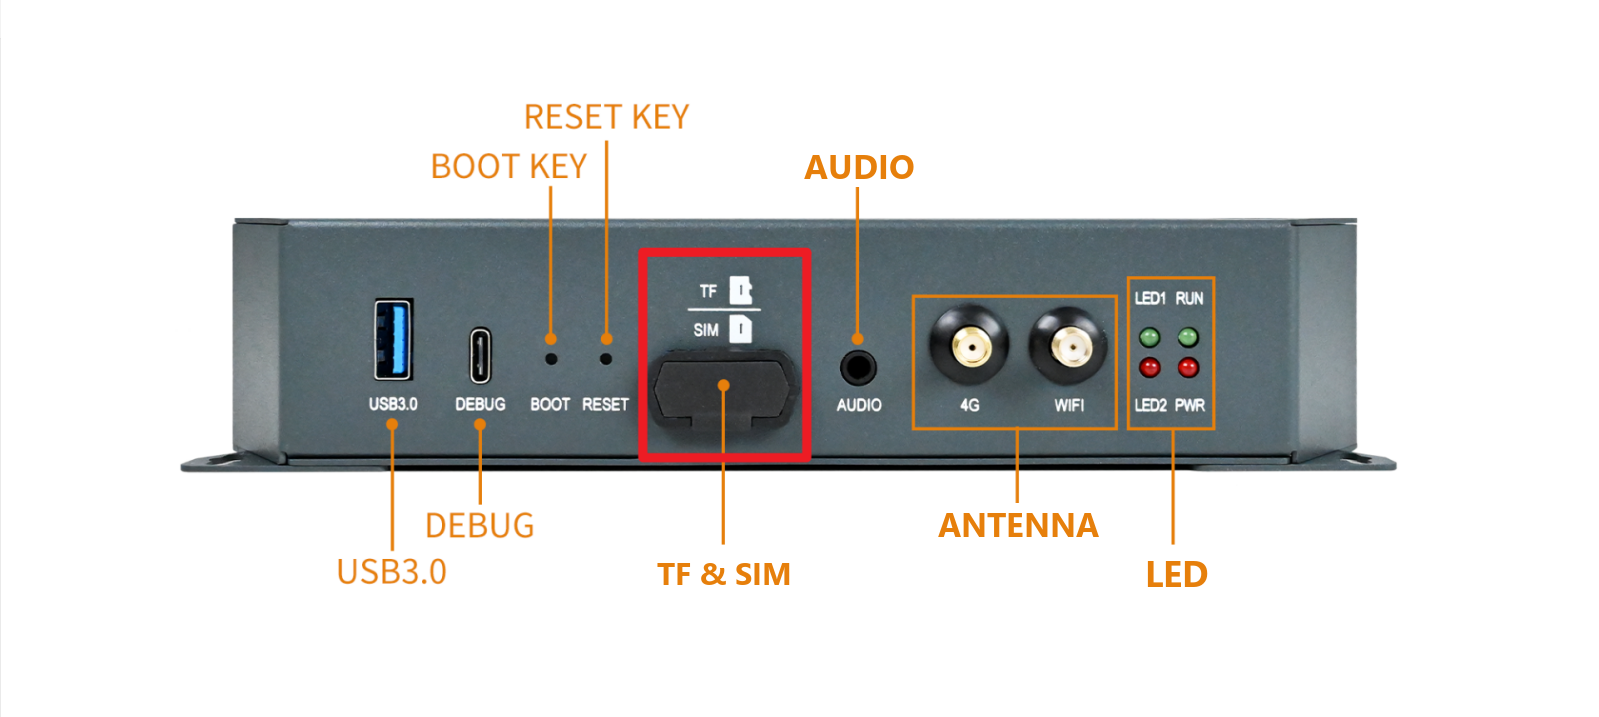
The FCU3101 supports 4G networking; the installed configuration depends on your order. At boot the 4G module is powered and its driver is loaded. The external antenna connector and SIM slot are shown below:


2.16.1 4G Communication Test
Insert the SIM card and power up, then check the USB devices with
lsusb:
root@FCU3101-buildroot:/# lsusb
Bus 003 Device 001: ID 1d6b:0002
Bus 003 Device 004: ID 0fe6:9900
Bus 001 Device 001: ID 1d6b:0002
Bus 004 Device 001: ID 1d6b:0001
Bus 002 Device 001: ID 1d6b:0003
Bus 003 Device 003: ID 0bda:d723
Bus 003 Device 005: ID 2c7c:0125              # 4G module node
Bus 003 Device 002: ID 1a40:0101
Once the module is detected, dial up and test the connection with
quectelCM:
root@FCU3101-buildroot:/# quectelCM &
Output:
root@FCU3101-buildroot:/# quectelCM &
[1] 1235
root@FCU3101-buildroot:~# [01-29_02:48:33:010] QConnectManager_Linux_V1.6.7
[01-29_02:48:33:013] Find /sys/bus/usb/devices/3-1.1 idVendor=0x2c7c idProduct=0x125, bus=0x003, dev=0x005
[01-29_02:48:33:013] Auto find qmichannel = /dev/cdc-wdm0
[01-29_02:48:33:014] Auto find usbnet_adapter = wwan0
[01-29_02:48:33:014] netcard driver = qmi_wwan, driver version = 6.1.141
[01-29_02:48:33:014] Modem works in QMI mode
[01-29_02:48:33:022] cdc_wdm_fd = 7
[01-29_02:48:33:101] Get clientWDS = 5
[01-29_02:48:33:133] Get clientDMS = 1
[01-29_02:48:33:165] Get clientNAS = 2
[01-29_02:48:33:197] Get clientUIM = 1
[01-29_02:48:33:229] Get clientWDA = 1
[01-29_02:48:33:261] requestBaseBandVersion EC20CEHDLGR08A06M1G
[01-29_02:48:33:389] requestGetSIMStatus SIMStatus: SIM_READY
[01-29_02:48:33:453] requestGetProfile[pdp:1 index:1] 3gnet///0/IPV4V6
[01-29_02:48:33:485] requestRegistrationState2 MCC: 460, MNC: 1, PS: Detached, DataCap: UNKNOW
[01-29_02:48:33:517] requestRegistrationState2 MCC: 460, MNC: 1, PS: Detached, DataCap: UNKNOW
[01-29_02:48:33:549] requestQueryDataCall IPv4ConnectionStatus: DISCONNECTED
[01-29_02:48:33:550] ip addr flush dev wwan0
[01-29_02:48:33:558] ip link set dev wwan0 down
[01-29_02:48:43:213] requestRegistrationState2 MCC: 460, MNC: 1, PS: Attached, DataCap: LTE
[01-29_02:48:43:310] requestSetupDataCall WdsConnectionIPv4Handle: 0x86d1bab0
[01-29_02:48:43:405] requestRegistrationState2 MCC: 460, MNC: 1, PS: Attached, DataCap: LTE
[01-29_02:48:43:438] requestRegistrationState2 MCC: 460, MNC: 1, PS: Attached, DataCap: LTE
[01-29_02:48:43:501] ip link set dev wwan0 up
[01-29_02:48:43:513] busybox udhcpc -f -n -q -t 5 -i wwan0
udhcpc: started, v1.36.1
udhcpc: broadcasting discover
udhcpc: broadcasting discover
udhcpc: broadcasting discover
...
Check the interface address:
root@FCU3101-buildroot:/# ifconfig wwan0
wwan0     Link encap:UNSPEC  HWaddr 00-00-00-00-00-00-00-00-00-00-00-00-00-00-00-00
          inet addr:10.139.93.197  P-t-P:10.139.93.197  Mask:255.255.255.252
          inet6 addr: fe80::8191:ecc:ba9d:798d/64 Scope:Link
          UP POINTOPOINT RUNNING NOARP MULTICAST  MTU:1500  Metric:1
          RX packets:19 errors:0 dropped:0 overruns:0 frame:0
          TX packets:86 errors:0 dropped:0 overruns:0 carrier:0
          collisions:0 txqueuelen:1000
          RX bytes:2086 (2.0 KiB)  TX bytes:9194 (8.9 KiB)
Test connectivity:
root@FCU3101-buildroot:/# ping www.baidu.com -I wwan0 -c 5
PING www.baidu.com (110.242.70.57) from 10.139.93.197 wwan0: 56(84) bytes of data.
64 bytes from 110.242.70.57: icmp_seq=1 ttl=54 time=117 ms
64 bytes from 110.242.70.57: icmp_seq=2 ttl=54 time=180 ms
64 bytes from 110.242.70.57: icmp_seq=3 ttl=54 time=2879 ms
64 bytes from 110.242.70.57: icmp_seq=4 ttl=54 time=1949 ms
64 bytes from 110.242.70.57: icmp_seq=5 ttl=54 time=959 ms

--- www.baidu.com ping statistics ---
5 packets transmitted, 5 received, 0% packet loss, time 50767ms
rtt min/avg/max/mdev = 116.629/1216.718/2879.427/1063.166 ms, pipe 3
2.16.2 4G Connection Daemon
The 4G connection daemon is built into the file system as the mobilemgmt image; compile and flash it as usual. For details, see 4G Daemon Application Guide for Linux, V7.6, 2025-09-19.
Run the command below to test it; it also reports SIM card status and signal strength:
root@FCU3101-buildroot:/# mobilemgmt
start running mobilemgmt version is ver07.007 ... ...
path=/sys/bus/usb/devices/3-1.3:1.2
[01-25_00:28:43:582] can not find qmi dev

path=/sys/bus/usb/devices/3-1.1:1.4
[01-25_00:28:43:583] Auto find qmichannel = /dev/cdc-wdm0
[01-25_00:28:43:583] Auto find usbnet_adapter = wwan0
[01-25_00:28:43:583] netcard driver = qmi_wwan, driver version = 6.1.141
The module was loaded normally after 5 seconds
[01-25_00:28:43:786] Modem works in QMI mode
[01-25_00:28:43:787] cdc_wdm_fd = 10
[01-25_00:29:13:817] QmiWwanInit message timeout
[01-25_00:29:13:831] QmiWwanThread read=-1 errno: 11 (Resource temporarily unavailable)
[01-25_00:29:43:818] QmiWwanGetClientID message timeout
[01-25_00:29:43:849] Get clientDMS = 1
[01-25_00:29:43:881] Get clientNAS = 2
[01-25_00:29:43:913] Get clientUIM = 1
[01-25_00:29:43:945] Get clientWDA = 1
[01-25_00:29:44:169] requestBaseBandVersion EC20CEHDLGR06A09M1G
[01-25_00:29:44:392] QmiWwanThread read=-1 errno: 11 (Resource temporarily unavailable)
[01-25_00:30:14:370] requestGetSIMStatus message timeout
[01-25_00:30:14:371] requestGetSIMStatus err = 110
no sim card,we can do nothing!!!
no sim card,we can do nothing!!!               # No SIM card detected
[01-25_00:30:18:408] QmiWwanThread read=-1 errno: 11 (Resource temporarily unavailable)
QMINAS_SYS_INFO_IND
2.17 SQLite
The on-board SQLite database is version 3.11.0. Test commands:
root@FCU3101-buildroot:/# sqlite3
SQLite version 3.44.2 2023-11-24 11:41:44
Enter ".help" for usage hints.
Connected to a transient in-memory database.
Use ".open FILENAME" to reopen on a persistent database.
sqlite> create table tbl1 (one varchar(10), two smallint);
sqlite> insert into tbl1 values('hello!',10);
sqlite> insert into tbl1 values('goodbye', 20);
sqlite> select * from tbl1;
hello!|10
goodbye|20
sqlite> .quit
Creating, reading, and writing the database all work normally.
2.18 DI/DO
2.18.1 Interface
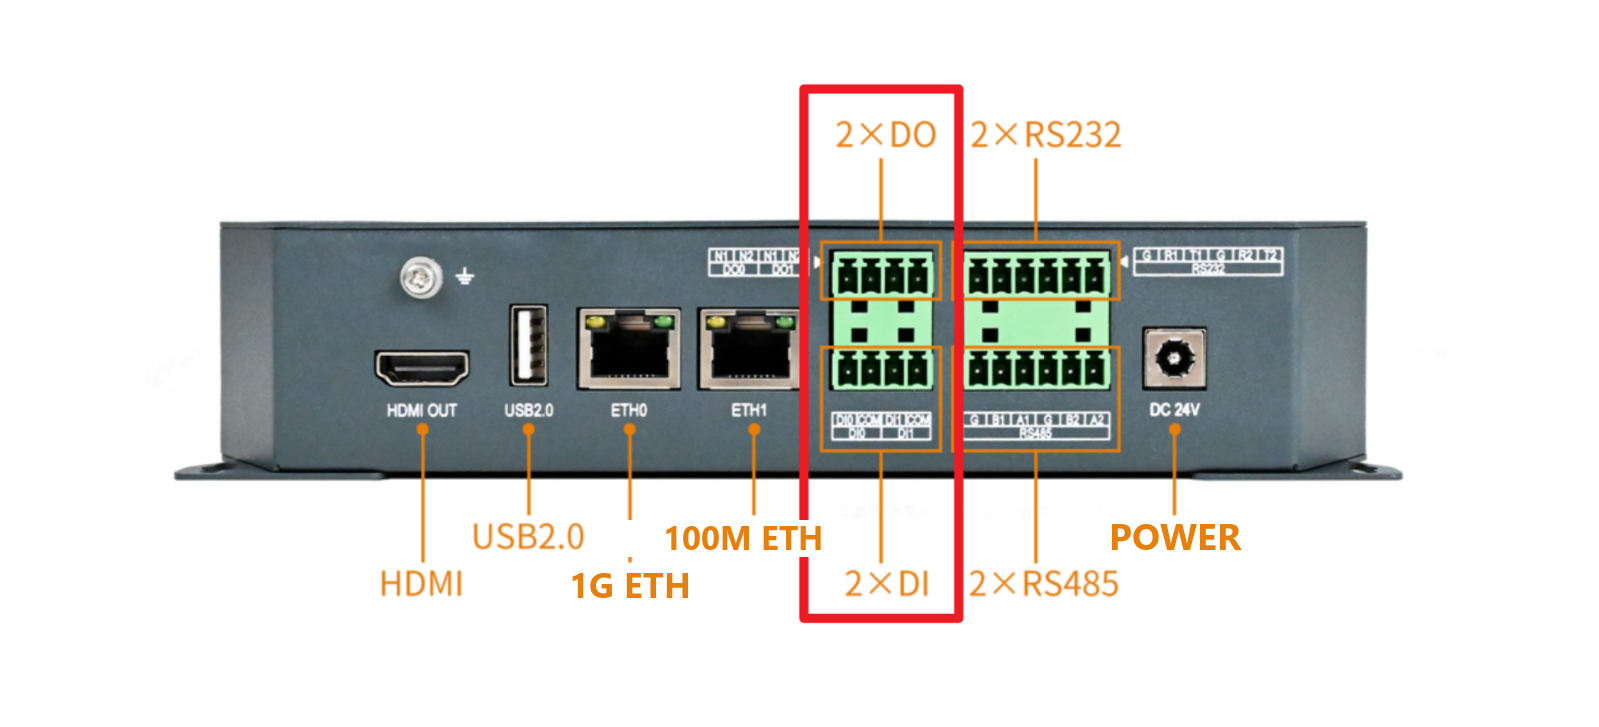
2.18.2 Device Mapping
Device node |
Silkscreen |
|---|---|
|
DO0 |
|
DO1 |
|
DI0 |
|
DI1 |
2.18.3 DO Test
Switching DO0 on and off (DO1 works the same way):
root@FCU3101-buildroot:/# echo 1 > /sys/class/leds/DO0/brightness   # on
root@FCU3101-buildroot:/# echo 0 > /sys/class/leds/DO0/brightness   # off
2.18.4 DI Test
Test through /dev/DI0 and /dev/DI1. Taking DI0 as an example, wire DI0 to DO0 and run:
root@FCU3101-buildroot:/# ls /dev/D*
/dev/DI0  /dev/DI1
root@FCU3101-buildroot:/# echo 1 > /sys/class/leds/DO0/brightness
root@FCU3101-buildroot:/# cat /sys/class/gpio-input/DI0/state
1
root@FCU3101-buildroot:/# echo 0 > /sys/class/leds/DO0/brightness
root@FCU3101-buildroot:/# cat /sys/class/gpio-input/DI0/state
0
root@FCU3101-buildroot:/#
2.19 Buzzer
The FCU3101 has a built-in buzzer that you can drive for your own alerts:
root@FCU3101-buildroot:/# echo 1 > /sys/class/leds/BZ/brightness   # Sound the buzzer
root@FCU3101-buildroot:/# echo 0 > /sys/class/leds/BZ/brightness   # Silence it
2.20 Audio Playback
Audio playback uses the ES8311 codec:
root@FCU3101-buildroot:/# gst-play-1.0 /userdata/media/test.mp3   # Play audio
mpp[1930]: mpp_info: mpp version: unknown mpp version for missing VCS info
mpp[1930]: mpp_info: mpp version: unknown mpp version for missing VCS info
mpp[1930]: mpp_info: mpp version: unknown mpp version for missing VCS info
mpp[1930]: mpp: unable to create enc vp8 for soc rv1126b unsupported
mpp[1930]: mpp_info: mpp version: unknown mpp version for missing VCS info
Press 'k' to see a list of keyboard shortcuts.
Now playing /userdata/media/test.mp3
Redistribute latency...
Redistribute latency...
0:00:01.9 / 0:04:59.9
2.21 Boot Autostart
The default startup script is /etc/init.d/rcS_compat. It is reserved for system use — do not put customer applications in it.
root@FCU3101-buildroot:/# cat /etc/init.d/rcS_compat
#!/bin/sh
for f in /etc/init.d/S*; do
    [ -x "$f" ] && "$f" start
done
Applications that should start at boot are managed through systemd services:
root@FCU3101-buildroot:/# ls /etc/systemd/system/multi-user.target.wants/   # Services started at boot
alsa-restore.service  input-event-daemon.service  ntpd.service             strongswan-starter.service  vsftpd.service
alsa-state.service    irqbalance.service          power-on-daemon.service  systemd-networkd.service    web.service
dcron.service         mosquitto.service           remote-fs.target         sysv-compat.service         wpa_supplicant.service
fltest-rgb.service    nginx.service               sshd.service             telnetd.service
To stop a service from starting at boot — nginx, for example:
root@FCU3101-buildroot:/# systemctl disable nginx.service   # Disable nginx autostart
Removed "/etc/systemd/system/multi-user.target.wants/nginx.service".
2.22 Custom Autostart
The user startup script is /etc/forlinx.sh; add any commands that must run at boot here.
2.22.1 Autostarting the 4G Dial-Up
To dial up automatically at boot, note that the 4G module needs time to initialize — in practice 3–5 seconds after boot. Add the following to /etc/forlinx.sh:
sleep 5
quectelCM &         # Start the 4G dial-up script in the background
exit 0              /* Add above "exit" */
For convenience, /etc/forlinx.sh can be created directly in the file system.
2.23 Static IP Configuration
The network nodes on the FCU3101 are eth0 and eth1 for wired connections and wlan0 for wireless. ETH0 and ETH1 ship with fixed IP addresses; you can assign your own addresses to suit your network.
Open /etc/systemd/network/10-eth0.network and configure eth0 as static:
[Match]
Name=eth0
KernelCommandLine=!root=/dev/nfs
[Network]
Address=192.168.0.232/24
Gateway=192.168.0.1
DNS=114.114.114.114
To set DNS, add the following to /etc/resolv.conf:
root@FCU3101-buildroot:/# echo nameserver 8.8.8.8 > /etc/resolv.conf
Then reboot:
root@FCU3101-buildroot:/# reboot
2.24 eMMC Health Monitoring
The FCU3101 file system includes an eMMC health-check utility. For full instructions, see eMMC Health Monitoring Tool User Guide. Example:
root@FCU3101-buildroot:~# mmcinfo /dev/mmcblk0 -y 10 -debug
root@FCU3101-buildroot:~# cat /var/mmc_guard/health.info
Forlinx EMMC Health Check Tool var:ver01.001
Capacity                  : 59680 ,(unit=1M)
Average erase count       : [ 0 / 3000 ]
Maximum erase count       : [ 1 / 3000 ]
Minimum erase count       : [ 0 / 3000 ]
Host total write          : 10.875000 ,(unit=1G)
Host total read           : 48.875000 ,(unit=1G)
Bad block count           : 0
Rewrite count             : 0
Power-on count            : 21
Write amplification       : 0.000000
Disk write capacity       : inf, (unit=1G)
last check interval write : 0.125000, (unit=1G)
Check statistics          : [ 0 / 2 ]
2.25 Python
The FCU3101 file system includes Python 3.11:
root@FCU3101-buildroot:/# python3
Python 3.11.8 (main, Feb 10 2026, 01:57:39) [GCC 12.4.0] on linux
Type "help", "copyright", "credits" or "license" for more information.
>>> print("Hello World from Python 3.11!")
Hello World from Python 3.11!
>>> exit()
root@FCU3101-buildroot:/#
2.26 Qt
The file system includes the Qt 5.15.11 libraries:
root@FCU3101-buildroot:/# find / -name qt
./usr/lib/qt
root@FCU3101-buildroot:/# ls /usr/lib/qt/plugins
bearer            # Network connection management plugins (e.g. VPN support)
iconengines       # Icon rendering engine plugins
platforminputcontexts  # Input method platform plugins
qmltooling        # QML debugging tool plugins
generic           # Generic plugins (e.g. printing support)
imageformats      # Image format plugins (e.g. JPEG/PNG decoding)
platforms         # Platform integration plugins (e.g. XCB/Wayland)
sqldrivers        # Database driver plugins (e.g. SQLite/MySQL)
……
2.27 MQTT
The file system includes MQTT support:
root@FCU3101-buildroot:/# mosquitto --help
mosquitto version 2.0.18
mosquitto is an MQTT v5.0/v3.1.1/v3.1 broker.
Usage: mosquitto [-c config_file] [-d] [-h] [-p port]
 -c : specify the broker config file.
 -d : put the broker into the background after starting.
 -h : display this help.
 -p : start the broker listening on the specified port.
      Not recommended in conjunction with the -c option.
 -v : verbose mode - enable all logging types. This overrides
      any logging options given in the config file.
See https://mosquitto.org/ for more information.
root@FCU3101-buildroot:/# ls /usr/bin/ | grep mosquitto   # Available MQTT client tools
mosquitto_pub
mosquitto_rr
mosquitto_sub
2.28 NTP
NTP is enabled on the FCU3101:
root@FCU3101-buildroot:/# ps -aux | grep ntp
  573 ntp      /usr/sbin/ntpd -u ntp:ntp -g -p /var/run/ntpd.pid
 3302 root     grep ntp
2.29 Iptables
The file system includes iptables:
root@FCU3101-buildroot:/# iptables -V
iptables v1.8.9 (legacy)
root@FCU3101-buildroot:/#
2.30 Telnet
The file system includes Telnet:
root@FCU3101-buildroot:/# telnet
BusyBox v1.36.1 (2025-12-30 23:08:12 CST) multi-call binary.
Usage: telnet [-a] [-l USER] HOST [PORT]
Connect to telnet server
        -a      Automatic login with $USER variable
        -l USER Automatic login as USER
root@FCU3101-buildroot:/# busybox telnetd --help
BusyBox v1.36.1 (2024-04-30 17:10:09 CST) multi-call binary.

Usage: telnetd [OPTIONS]

Handle incoming telnet connections

        -l LOGIN        Exec LOGIN on connect
        -f ISSUE_FILE   Display ISSUE_FILE instead of /etc/issue
        -K              Close connection as soon as login exits
                        (normally wait until all programs close slave pty)
        -p PORT         Port to listen on. Default 23
        -b ADDR[:PORT]  Address to bind to
        -F              Run in foreground
        -i              Inetd mode
        -w SEC          Inetd 'wait' mode, linger time SEC
                inetd.conf line: 23 stream tcp wait root telnetd telnetd -w10
        -S              Log to syslog (implied by -i or without -F and -w)
2.31 Cron
The file system includes crond:
root@FCU3101-buildroot:~# ps -ef | grep -i cron
root         470       1  0 04:20 ?        00:00:00 /usr/sbin/crond -S
root         707       1  0 04:20 ?        00:00:00 crond -l 8 -L /var/log/cron.log -c /etc/mycron/
root        5899     721  0 04:46 ttyFIQ0  00:00:00 grep --color=auto -i cron
root@FCU3101-buildroot:~# crontab –e      # Open the crontab editor
* * * * * date >> /tmp/cron_test.log      # Add a job that appends the date every minute
# Wait a minute or two, then check the log
root@FCU3101-buildroot:~# cat /tmp/cron_test.log
Wed Apr 15 04:49:01 UTC 2026
Wed Apr 15 04:50:01 UTC 2026
Wed Apr 15 04:51:02 UTC 2026
2.32 Lrzsz
The file system includes the lrzsz tools:
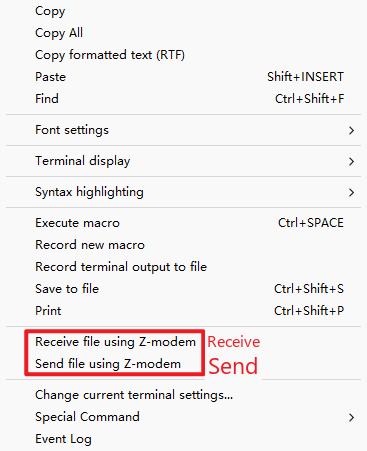
Note: your terminal emulator must support the ZMODEM protocol. MobaXterm was used for this test.
root@FCU3101-buildroot:~# which rz sz
/usr/bin/rz
/usr/bin/sz
# Test sz
root@FCU3101-buildroot:~# sz -be /1.txt
▒lrz waiting to receive.
Receiving: 1.txt
      0 [main] lrz 1294 cygwin_exception::open_stackdumpfile: Dumping stack trace to lrz.exe.stackdump
lrz waiting to receive.
Transfer complete    # Transfer finished
# Test rz
root@FCU3101-buildroot:~# cd /tmp/    # Change to the directory where the file should be saved
root@FCU3101-buildroot:/tmp# rz –be    # Run the command, then send the file
▒Sending: 1.txteceive.**B0100000063f694

Bytes Sent:      0   BPS:0

Transfer complete
root@FCU3101-buildroot:/tmp# ls
1.txt
2.33 Ntpdate
ntpdate is a command-line tool that synchronizes the system clock with a time server over the network. The device must have network access before testing. The FCU3101 file system includes it:
# Check connectivity to the time server; drop -q to actually set the clock.
root@FCU3101-buildroot:/ # ntpdate -q ntp.aliyun.com
server 203.107.6.88, stratum 2, offset +0.008375, delay 0.04376
27 Apr 17:26:04 ntpdate[3168]: adjust time server 203.107.6.88 offset +0.008375 sec
2.34 Curl
curl is a powerful command-line tool for data transfer. The FCU3101 file system includes it:
root@FCU3101-buildroot:~# curl -V
curl 8.6.0 (aarch64-buildroot-linux-gnu) libcurl/8.6.0 zlib/1.3.1 libpsl/0.21.5 nghttp2/1.58.0 librtmp/2.3
Release-Date: 2024-01-31
Protocols: dict file ftp gopher http imap ipfs ipns mqtt pop3 rtmp rtsp smtp telnet tftp
Features: alt-svc AsynchDNS HTTP2 IPv6 Largefile libz PSL threadsafe UnixSockets
# Test server connectivity
root@FCU3101-buildroot:~# curl -I http://www.forlinx.com
HTTP/1.1 301 Moved Permanently
Server: nginx
Date: Wed, 29 Apr 2026 00:52:40 GMT
Content-Type: text/html
Content-Length: 162
Connection: keep-alive
Location: https://www.forlinx.com/
2.35 Tcpdump
tcpdump captures network traffic that can then be analyzed in Wireshark. The FCU1501/FCU3101 file system includes it:
root@FCU3101-buildroot:/# timeout 10 tcpdump -i eth0 -w /tmp/test_capture.pcap &
[1] 175549
root@FCU3101-buildroot:/# tcpdump: listening on eth0, link-type EN10MB (Ethernet), snapshot length 262144 bytes
ping www.forlinx.com
PING s-526319.gotocdn.com (211.149.226.120) 56(84) bytes of data.
64 bytes from 211.149.226.120: icmp_seq=1 ttl=54 time=31.9 ms
64 bytes from 211.149.226.120: icmp_seq=2 ttl=54 time=31.5 ms
540 packets captured     # 540 packets captured
561 packets received by filter
0 packets dropped by kernel
64 bytes from 211.149.226.120: icmp_seq=3 ttl=54 time=31.2 ms
64 bytes from 211.149.226.120: icmp_seq=4 ttl=54 time=31.8 ms
64 bytes from 211.149.226.120: icmp_seq=5 ttl=54 time=31.5 ms
64 bytes from 211.149.226.120: icmp_seq=6 ttl=54 time=33.6 ms
64 bytes from 211.149.226.120: icmp_seq=7 ttl=54 time=36.2 ms
64 bytes from 211.149.226.120: icmp_seq=8 ttl=54 time=34.8 ms
64 bytes from 211.149.226.120: icmp_seq=9 ttl=54 time=31.6 ms
64 bytes from 211.149.226.120: icmp_seq=10 ttl=54 time=31.8 ms
64 bytes from 211.149.226.120: icmp_seq=11 ttl=54 time=31.9 ms
64 bytes from 211.149.226.120: icmp_seq=12 ttl=54 time=31.1 ms

--- s-526319.gotocdn.com ping statistics ---
12 packets transmitted, 12 received, 0% packet loss, time 12833ms
rtt min/avg/max/mdev = 31.115/32.412/36.189/1.532 ms
[1]+  Exit 124                timeout 10 tcpdump -i eth0 -w /tmp/test_capture.pcap
2.36 IP Camera
The FCU3101 is designed to work with IP cameras. Before testing connectivity, make sure the camera supports RTSP and is on the same LAN as the FCU3101.
Obtaining the RTSP address
Ask the camera vendor for the address. Hikvision cameras, for example, usually use this format:
rtsp://[username]:[password]@[IP address]:[port]/Streaming/Channels/[channel][stream type]
This test uses a Mingchuangda IP camera:
Parameter |
Value |
|---|---|
User name |
admin |
Password |
(empty) |
IP address |
192.168.1.117 |
Checking that the camera is online
root@FCU3101-buildroot:~# ping 192.168.1.117 -c 3
PING 192.168.1.117 (192.168.1.117) 56(84) bytes of data.
64 bytes from 192.168.1.117: icmp_seq=1 ttl=64 time=0.446 ms
64 bytes from 192.168.1.117: icmp_seq=2 ttl=64 time=0.582 ms
64 bytes from 192.168.1.117: icmp_seq=3 ttl=64 time=0.819 ms

--- 192.168.1.117 ping statistics ---
3 packets transmitted, 3 received, 0% packet loss, time 2052ms
rtt min/avg/max/mdev = 0.446/0.615/0.819/0.154 ms
Reading the camera format
This command reports the codec, width, height, and frame rate:
root@FCU3101-buildroot:~# ffprobe -v error -select_streams v:0 -show_entries stream=codec_name,width,height,r_frame_rate -of csv=p=0 "rtsp://admin:@192.168.1.117"   # Insert the actual RTSP address
hevc,2304,1296,20/1
Output |
Meaning |
|---|---|
|
Codec: H.265 |
|
Resolution |
|
Frame rate: 20 fps |
Capturing a still image
Capture a single frame to confirm the camera works and is aimed correctly:
root@FCU3101-buildroot:~# ffmpeg -rtsp_transport tcp -fflags +genpts -an -i "rtsp://admin:@192.168.1.117" -ss 1.8 -vframes 1 -an -y output.jpg
root@FCU3101-buildroot:~# ls -l
total 116
-rw-r--r-- 1 root root 116715 Sep  9 10:23 output.jpg
3. Flashing the System
3.1 Flashing from a USB Drive
3.1.1 Creating the Flashing USB Drive
Copy an image that boots correctly on the board to any directory.
Required tool:
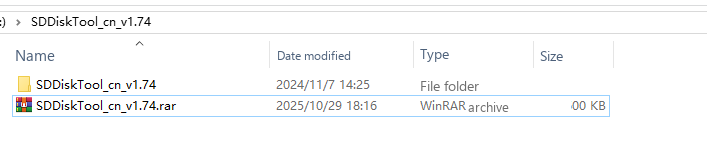
Software Package\3. Tools\System Update Tools\SDDiskTool_cn_v1.74.rar
Step 1: extract SDDiskTool_cn_v1.74.rar to a path that contains no Chinese characters.
Step 2: insert the TF card into the PC through a USB drive or USB card reader.
⚠️ Note: the maximum supported card capacity is 32 GB; larger cards may fail to flash. 16 GB is recommended.
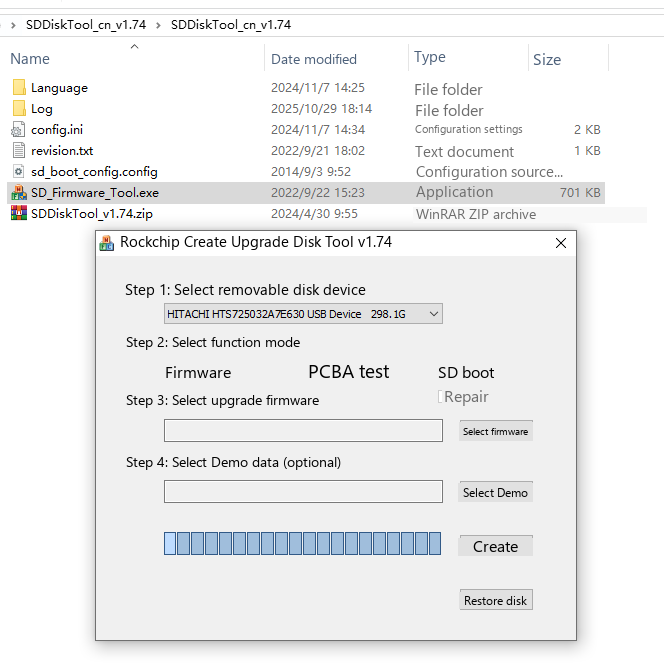
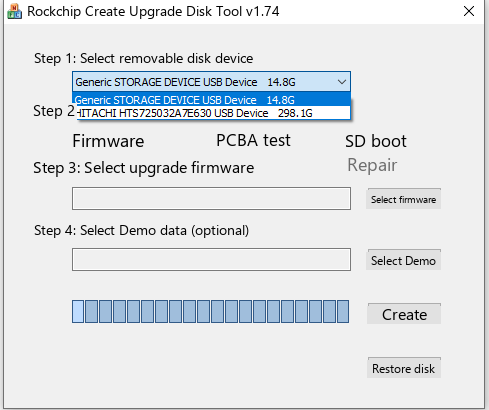
Step 3: select the removable device that corresponds to your USB drive or card reader.
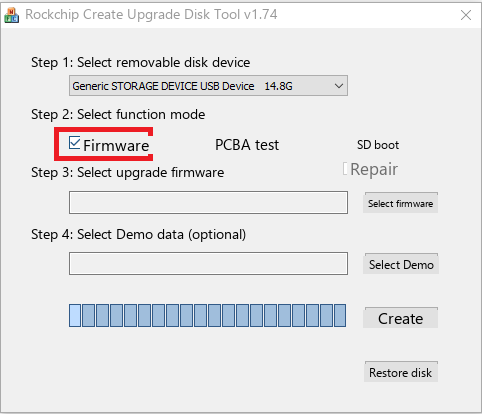
Select your device and tick Firmware upgrade:
Step 4: select the firmware image.
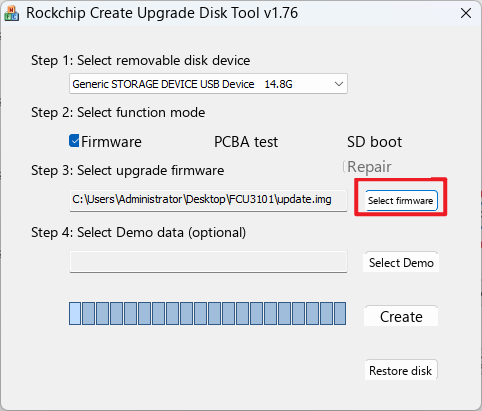
Browse to the image you want to flash.
Step 5: click Create.
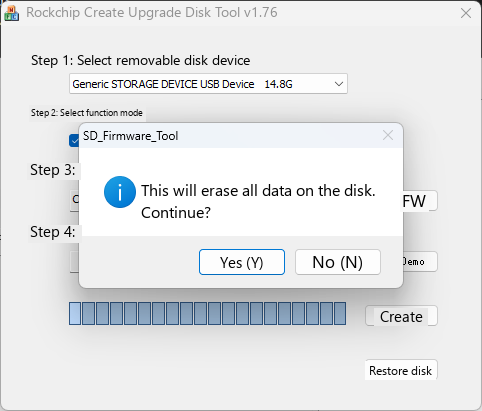
Click Yes and wait for the process to finish:
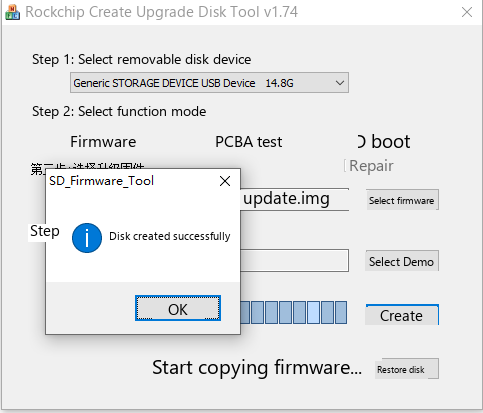
Click OK to complete.
3.1.2 Flashing the Device
To flash from a USB drive, the board must already have a working image flashed to its storage over OTG. Insert the prepared USB drive into the FCU3101’s USB port and power the device on; flashing starts automatically. When the buzzer signals completion, unplug the drive and the device is ready to use. Example boot log:
U-Boot 2017.09-g53ef188-dirty #zhangao (Feb 10 2026 - 01:11:40 -0700)

Model: Forlinx OK1126B-S board
MPIDR: 0x0
PreSerial: 0, raw, 0x20810000
DRAM:  2 GiB
Sysmem: init
Relocation Offset: 7d958000
Relocation fdt: bb7fa3f0 - bb7fecf0
CR: M/C/I
DM: v2
mmc@21470000: 0, mmc@21d60000: 1
Best phase range 259-237 (31 len)
Successfully tuned phase to 68, used 4ms
Bootdev(atags): mmc 0
MMC0: HS200, 200Mhz
PartType: EFI
boot mode: normal
RESC: 'boot', blk@0x0001d4b9
resource: sha256+
FIT: no signed, no conf required
DTB: rk-kernel.dtb
HASH(ce): OK
I2c0 speed: 100000Hz
PMIC:  RK8013 (on=0x08, off=0x00, req_dvs: 0, act: high)
vdd_npu 950000 uV
vdd_logic 900000 uV
vdd_cpu init 950000 uV
I2c2 speed: 100000Hz
params load
Found phandle 0x206 for node /ethernet@21c70000/mdio/phy@1 (property: phandle)
use 0xbde00000 as drm logo base memory
Can't get crtc id, default set to id = 0
Could not find baseparameter partition
Model: Forlinx FCU3101 Board
eth0 mac from vendor_storage is 6a:d7:a1:6e:37:bd
eth0 mac is valid!!
eth1 mac from vendor_storage is 22:d6:5c:79:33:5f
eth1 mac is valid!!
starting USB...
Bus usb@21480000: USB EHCI 1.00
Bus usb@214c0000: USB OHCI 1.0
Bus usb@21500000: usb maximum-speed not found
Register 2000140 NbrPorts 2
Starting the controller
USB XHCI 1.10
scanning bus usb@21480000 for devices... 5 USB Device(s) found
scanning bus usb@214c0000 for devices... 1 USB Device(s) found
scanning bus usb@21500000 for devices... 2 USB Device(s) found
       scanning usb for storage devices... 1 Storage Device(s) found
Scanning usb 0 ...
=== Booting from usb 0 ===
...
Flashing takes about two minutes, mostly limited by the USB 2.0 transfer rate. During flashing the RUN LED stays on; when it completes, the buzzer sounds once (about 2 seconds), the RUN LED blinks once per second, and the console shows Please remove U DISK!!!, wait for reboot. Unplug the drive and the system reboots automatically; once it is up, RUN switches to heartbeat mode.
3.2 Flashing over OTG
3.2.1 Installing the OTG Driver
The OTG port is inside the enclosure, but the device can be flashed through its USB 3.0 port.
📚 Path: Software Package\3. Tools\System Update Tools\DriverAssitant_v5.13.zip
Extract the archive to any directory and run it with administrator privileges.
Open DriverInstall.exe:
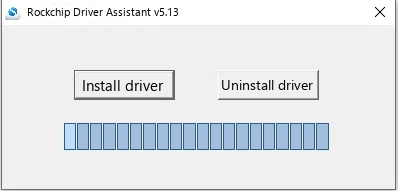
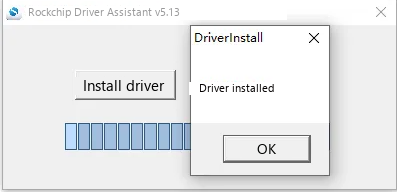
Click Driver install:
3.2.2 Full OTG Flash Test
1. Flashing with RKDevTool
📚 Path: Software Package\3. Tools\System Update Tools\RKDevTool_v3.32_for_window.rar
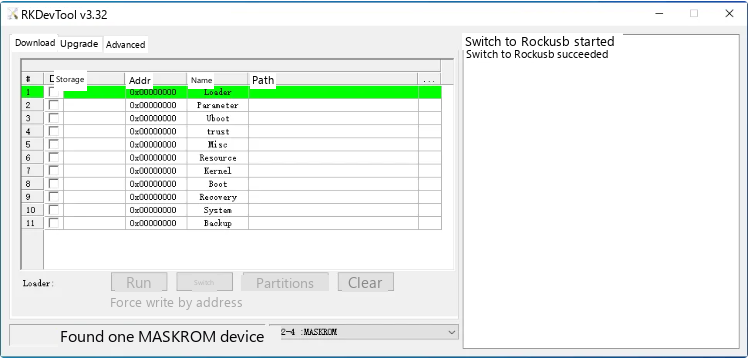
RKDevTool is Rockchip’s development tool. Extract it to a path containing only ASCII characters, connect the FCU3101’s internal OTG port with a Type-C cable, hold the BOOT button, then power-cycle the device or press RESET. Release BOOT after about two seconds; the tool reports a MASKROM device.
Note: in theory RKDevTool can be extracted anywhere, but some users report that the extraction path must contain only ASCII characters. If the tool does not look like the screenshot below after opening, try extracting it to an ASCII-only path.
Open RKDevTool:
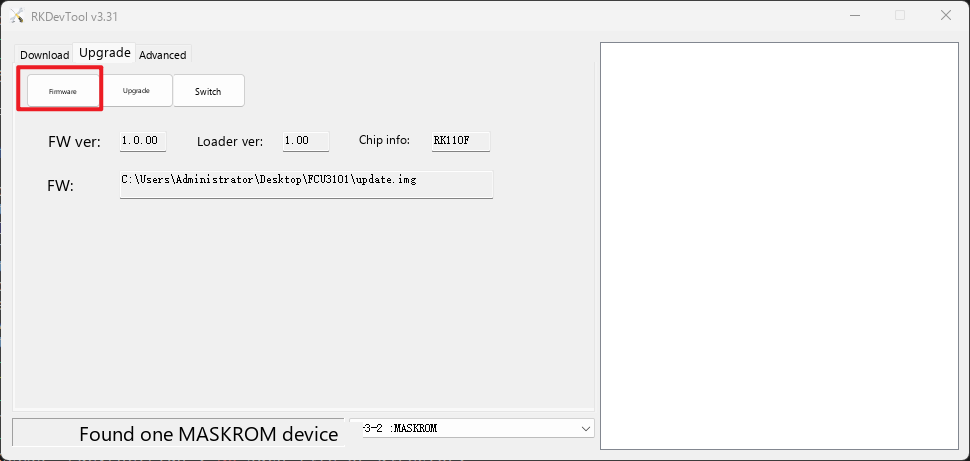
Select the firmware image to flash:
Hold the BOOT button while powering on; once MASKROM is detected, release the button and click Upgrade. Wait for the download to complete:
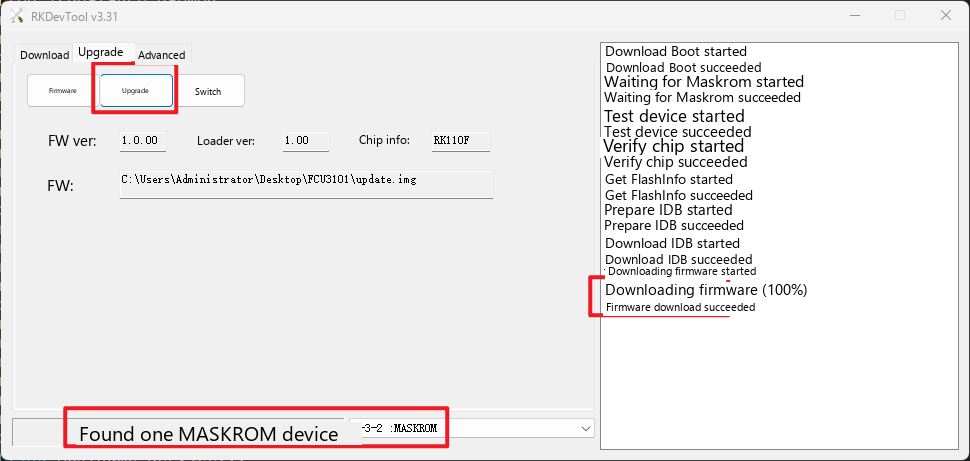
Note: in MASKROM mode, do not click “Device partition table” — it has no effect. flashing individual partitions in MASKROM mode does not clear the U-Boot environment variables.